
Install IIS on Windows Server
**1)**On the Start page, click the Server Manager tile.
2) In Server Manager, select Dashboard, and click Add roles and features.
3) In the Add Roles and Features Wizard, on the Before You Begin page, click Next.
4) On the Select Installation Type page, select Role-based or Feature-based Installation and click Next
5) On the Select Destination Server page, select Select a server from the server pool, select your server, and click Next.
6) On the Select Server Roles page, select Web Server (IIS), and then click Next.
7) Check "Include Management tools(if applicable)" and click "Add Features".
8) On the Select Features page, note the preselected features that are installed by default, and then click Next.
9) On the Web Server Role (IIS) click Next
10) On the Select Role Services page, note the preselected role services that are installed by default, and then select CGI checkbox, click next**.**
11) On the Confirm Installation Selections page, confirm your selections, check the option to restart the destination server automatically and then click Install.
To verify that IIS installed successfully, type the following into a web browser:

You should see the default IIS Welcome page, check the example below:
Download and Install PHP Manually
- Install PHP and WinCache.
- Add the PHP installation folder to the Path environment variable.
- Set up a handler mapping for PHP.
- Add default document entries for PHP.
- Test your PHP installation.
Download PHP and the WinCache extension.
1) Open your browser to Windows for PHP Download Page and download the PHP 8.1 non-thread-safe zip package .
2) Download the WinCache extension from the List of Windows Extensions for PHP.
3) Extract all files in the PHP .zip package to a folder of your choice, for example:

In this documentation we are using php installation in Windows root *C:\php*
4) Extract the WinCache .zip package to the PHP extensions folder (**C:\php**ext), click OK:
The WinCache .zip package contains one file (Php_wincache.dll).
5) Open Control Panel, click System and Security, click System, and then click Advanced system settings.
6) In the Environment Variables optionUnder System variables, select Path option, and then click Edit.
7) Add the path to your PHP installation folder to the end of the Variable value, for example C:\php and Click OK.
8) Open IIS Manager.
9) Select the hostname of your computer in the Connections panel, and then double-click Handler Mappings.
10) In the Action panel, click Add Module Mapping.
Follow values below:
- In Request path, type: *.php.
- From the Module menu, select FastCgiModule.
- In the Executable box, type the full path to Php-cgi.exe, for example C:\php\Php-cgi.exe.
- In Name, type a name for the module mapping, for example FastCGI,Click OK.
11) Select the hostname of your computer in the Connections panel, and double-click Default Document.
12) In the Action panel, click Add. Type Index.php and****Default.php in the Name box, and then click OK.
Configuring PHP environment
1) Rename php.ini-development to php.ini in path c:\php
And change the following values in the php.ini file:
max_execution_time = 3600max_input_time = 3600max_input_vars = 10000memory_limit = 1024Mpost_max_size = 1024Mupload_max_filesize = 1024Mmax_file_uploads = 200short_open_tag = On
2) Enable the extensions listed below, by uncommenting them (Remove the semicolon**;**at beginning of line).

You must enable the pdo_sqlite extension for scriptcase to work.
Default Extensions
extension=bz2extension=curlextension=gd2extension=gettextextension=imapextension=ldapextension=fileinfoextension=mbstringextension=opensslextension=exifextension=xslextension=soap
| Extensions | Driver enabled in Scriptcase |
|---|---|
extension=mysqli |
MySQLi |
extension=odbc |
DB2 ODBC GENERIC, DB2 ODBC GENERIC 6, Generic ODBC, MS Access ODBC, MS SQL Server ODBC, Oracle ODBC, Progress |
extension=pdo_mysql |
MySQL PDO |
extension=pdo_odbc |
DB2 PDO ODBC, Progress PDO ODBC, Sybase PDO ODBC |
extension=pdo_pgsql |
PostgreSQL PDO |
extension=pdo_sqlite |
SQLite PDO |
extension=pgsql |
PostgreSQL 6.3 or below, PostgreSQL 6.4 or above, PostgreSQL 7 ou Acima |
Enabling the SourceGuardian Loader
Before you start the Scriptcase installation, you need to enable the loader responsible for encrypting Scriptcase in PHP. Follow the steps below to perform this action successfully.
1 - Extract the SourceGuardian Loader file downloaded.
If you haven’t downloaded it yet click here and download the file according to the architecture used.
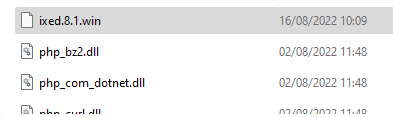
2 - Copy the ixed.8.1.win file and paste it into the PHP extensions directory C:\php\ext.
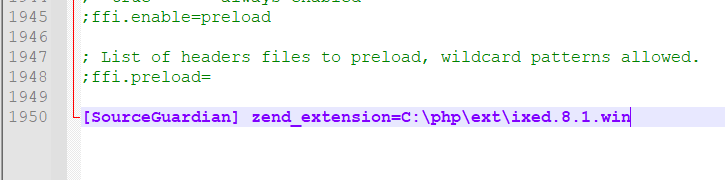
3 - Edit the php.ini file and below the last line enter the path to the extension within the zend_extension parameter:
Example:[SourceGuardian] zend_extension=C:\php\ext\ixed.8.1.win
4 - Restart the IIS
Manual Scriptcase Installation
- To install scriptcase, follow the documentation through this link: Scriptcase Typical Installation