
Host
How to install WordPress?
WordPress is free open source software that you can install on your hosting account. In this article you will learn how to install WordPress through Softaculous. 1. You must access cPanel, and click on “Softaculous Apps Installer”; 2. Click the WordPress icon; 3. Now click on "Install"; 4. Fill in some settings and click "Install"; 5. You will now have access to your page link by clicking on the "Admin" icon you will have access to the administrator panel, where you create your website; 6. WordPress will automatically create a database and a user in your hosting account. Note: We strongly recommend using the WordFence plugin after installation.
How to update WordPress?
The updated WordPress improves security, speed, introduces new features, improves performance and corrects possible flaws. 1. Before upgrading, it is recommended to back up. 2. It is recommended that you disable all plugins before upgrading, it is possible that there is a conflict with the plugins that already exist. - You must access cPanel, and click on “Softaculous Apps Installer”; - You need to access the WordPress admin panel, which can be accessed through "Softaculous", by clicking on the "admin" icon; - You will be directed to the administrator panel; - When there is an update pending in WordPress, a warning appears on the first page of the panel in the left corner of the screen, click on this option to see all available updates; - Just click on the pending update to start the process.
How to migrate your local Scriptcase to your hosting account
You can upload your local projects and database from your hosting account, just follow these steps: 1. Export your projects from the local Scriptcase, if you need help you can follow this tutorial. 2. Request a new license to register in your Scriptcase, if you need help you can follow this tutorial. 3. Register your new license in your hosted Scriptcase, if you need help you can follow this tutorial. 4. Import your project to the hosted Scriptcase, if you need help you can follow this tutorial.
How to select the main PHP version for your hosting service
Login in your cPanel account and then search for "Software" a category. Click in "Select PHP Versions" icon. By default the selected PHP is the native. You can change it to version which you want. Select the packages which you want to active. Click in "Save" button( in the bottom of the package list ). Now, you need to click in "Set as current" button to set the current PHP version to your environment.
How to check Bandwidth Usage?
1. In the "Metrics" section, click on "Bandwidth" Icon. 2. Scroll down to the end of page and you can see bandwidth usage in a graph.
How to install and access Scriptcase in your hosting account
Our hosting service provides a exclusive Scriptcase installer and you can easily install any version of Scriptcase available in the installation list. Once already logged in the cPanel of your hosting service, follow these steps to install. Step 1. In the cPanel homepage find the Scriptcase icon in the SOFTWARE section and click. Step 2. Select the Scriptcase version that you would like to install and click in "Install". Wait some time while the installation is being done. Find your installation in "Current Installations" list and click in "Go To" to access your Scriptcase. The installation comes in trial version, you can register this installation with your Scriptcase license.
How to install a application with Softaculous
Step 1 First access your cPanel. Inside cPanel look for the "Software" section and "Softaculous Apps Installer" Step 2 In softaculous look for the application you want to install, in this tutorial we will install Wordpress: Step 3 . Under "Software Configuration", choose whether you want to redirect access to wordpress to the HTTP or HTTPS protocol and over www or not. Also choose the directory to install Wordpress, following the steps as in the image: Step 4 2. Create an admin username and password for Wordpress. You can also enter an admin email for wordpress. 3. Select your website/blog theme and install. When the installation is complete, you will see a page that informs you of a successful creation message. Hope this helps !
How to install Auto SSL certificate
The SSL certificate is already installed on your hosting service, or when you add a domain to your service, it is also installed. 1. To check if the certificate is active on your domain, simply access cPanel and click on SSL/TLS Status. 2. By accessing SSL/TLS Status, you can check all your domains and subdomains, and you can search for the desired domain. 3. Just select all or just the domain you want to enable SSL/TLS, and click "Run AutoSSL". To access your service with SSL, simply access your service via the HTTPS protocol:https://YOURDOMAIN If you have any problems with access, please contact our support at: www.scriptcase.host or client.scriptcase.host
How to blacklist a IP address
You can block access to a directory with a password using the "IP Blocked" cPanel. 1. Sign in to your cPanel account. 2. In the "Security" section, click the "IP Blocker" icon. 3. In "Add an IP or range" you must enter the IP address you want to block. Then click the "Add" button. Examples of use: Unique IP address: 192.168.0.1 Range: 192.168.0.1-192.168.0.40 Default range: 192.168.0.1-40 CIDR format: 192.168.0.1/32 Implies 10... — 192.* I hope I have helped!
How to install SSL certificate
First, make a order of SSL certificate. After payment access your Client area >> Services, and click in view details of certificate SSL In next page, click in View certificate Details In next page, click in configure certificate, and you will see the page below in Web Server type, choice 'cPanel / WHM'. After this access cPanel (but do not close this page), to get CSR of your domain. In Cpanel, access SSL / TLS: After this click in generate, view, or delete SSL certificate signing requests. You will see this screen, fill the data, and proceed. After this your CSR, your CSR will be generated, select and put in the Client Area After you submit your CSR and data of SSL, you will see this page: We prefer the first(HTTP based validation), but you can choice others, to receive e-mail. If you select first option, you see this page, just create this file in public_html of your domain, and wait to be validated.
How to protect a folder with username and password
You can password lock a directory using cPanel's "Directory Privacy" option. 1. Log in to your cPanel account, see how to access cPanel at: https://help.scriptcase.net/portal/en/kb/articles/first-steps-with-the-hosting-access 2. In the "Files" section, click the "Directory Privacy" icon. 3**.** On the right side of the screen, click the "Settings" button. When a small window prompts you, choose "Document Root for", select the domain where the folder is located and click the "Save Changes" button. 4. Under "Security Settings" check the box next to "Password protect this directory" and enter a name for the protected directory, such as "Password protected area". Then click on the "Save" button. 5. Scroll down the page and under "Create User", fill in the username and password fields or use the Password Generator option to generate a new random password and click "Save". Now if you try to open your password protected directory in your browser via the URL which is already password protected, your browser will prompt you to enter the username and password.
How to protect your Website's images from an external Website
External Website can use < img /> tag to display an image from your site somewhere else on the internet and The end result of this is that the other website steals your bandwidth. 1. Log into your cPanel account. 2. In the "Security" section, click on "HotLink Protection" Icon. 3. If it displays "Hotlink protection is currently disabled", click on the "Enable" button. How to Configure Hotlink Protection? Under "List the URLs to which you wish to allow access" you can allow an external website or your own website to have access. For example, if you have a subdomain like demo.example.com, you can add this website's url to the list of allowed websites.
How to check disk usage
If you are receiving a disk space usage warning and don't know which folder is using too much space from cPanel. 1. Log into your cPanel account. 2. In the "Files" section, click on "Disk Space Usage" Icon. 3. In Disk Space Usage area you can see which folder/directory is using too much space and you can even check the disk usage of MySQL.
How to use the Google Public DNS
When your connection is bad or awkward, the problem is not found in the Domain Name System (DNS) server. It transforms websites with "beautiful" addresses, such as scriptcase.com, into their respective IP addresses to be read by your ISP. If the provider's DNS is overloaded, pages may be very slow. In this case, it is not the fault of the internet. We will now present ways on how to perform DNS change on each operating system. Windows 10 1 - Open the start menu and click Settings, represented by the gear symbol. 2 - Get in Network and Internet. 3 - Click on the Wi-Fi tab (even if you are on cable). 4 - Scroll to the bottom and click Change Adapter Options. 5 - On your connection, right click. 6 - Click on Properties. 7 - Authorize access with your administrator password. 8 - In the window that opens, look for IP Protocol Version 4 (TCP / IPv4) and click Properties. 9 - Enable the Use the following DNS server addresses option. 10 - Enter the preferred and secondary DNS addresses. Google's DNS addresses are the best to use in this case. They are 8.8.8.8 and 8.8.4.4, respectively. macOS 1 - Click on the Apple apple in the upper left corner. 2 - Enter System Preferences and select the Network menu. 3 - Select the type of connection you are using (such as Wi-Fi). 4 - Click the Advanced button and enter the DNS tab. 5 - Delete all addresses that are in the left table and click (+) to add new ones. 6 - Use the Google addresses mentioned above.
How to change language of your cPanel
CPanel supports a lot of languages, and if you want to change your cPanel language to your native language, you should follow this tutorial. 1. Log into your cPanel account. In the "Preferences" section, click on "Change Language" Icon. 3. From the cPanel Language Configuration Page, chose your language from the dropdown menu and then click on the "Change" button. Hope this helps !
First steps with hosting: Registration
To hire a hosting service is very easy. First you must choose a hosting plan. You can view Scriptcase hosting plans on the following page: https://scriptcase.host/en/scriptcase-host For other types of services visit: https://scriptcase.host/ Select a desired plane. If you are not registered on the scriptcase.host site, you can register at the time of hiring the first service with us. Fill in the information for your first service under "Products". Also fill in the contact information in " New client ", this information will be used later to log in to the client center (client.scriptcase.host). Click "Submit". In the next page will be displayed some register informations. Click in “Continue”. The next step is extreme important. For security reasons to your register be valided, is necessary realize the e-mail conformation validation that was sent to the e-mail used in the register. Access your email account and verify an e-mail with a title “Confirm your register”. And realize the access from this link to client area client.scriptcase.host with the e-mail account that was used in the register. You will receive a validation success confirmation when realize the login: From that moment, your register was activated. Your first order that was made along with the register will be activated in until 24 hours. From beginning, you can navigate through the client area and do some customizations, like for example: Do modifications in your register, no canto superior direito: Change the language in the lower right corner: You can verify the services status. After the service activation, you are gonna receive a notification with the access informations to the service. That can be checked in this tutorial. (PS: All the informations and crendentials used here, in this tutorial are fake, you should use your reals crendentials in the register).
How to change cPanel style theme
1. Log into your cPanel account. 2. In the "Preferences" section, click on the "Change Style" Icon. 3. You will see a lot of themes on the themes page. Just select the one you like and click on "Apply".
First steps with the Hosting: access
When you receive the access information by email, you can do the access to the hosting service with the access information include in the email. You can access the hosting service panel (cPanel) in two ways. 1. The first one is by the client area (client.scriptcase.host), using the email and password used in the client register. 1. When you enter the client area, access the service option. 1. In the services visualization, click in "Manage " in the desired service. 1. When accessing the informations page of this service, click in "Log to cPanel", to access the service panel. You will be directed to the cpanel. The second one is doing the login with the access informations that was sent to email "New account informations". Should have a similar content like the image above, however with the service informations. Use one of the five access URLs that indentify the server, like the exemple, the domain/subdomain of your service or service address. We are gonna use the service subdomain, "estefanegrese.myscriptcase.com", along with the information that identify the cpanel access, that can be: "cpanel.estefanegrese.myscriptcase.com" or "estefanegrese.myscriptcase.com/cpanel". The login screen will be displayed, type the service user and password: This is the cPanel standard interface: From now on, you can search the desired option or realize a search in the search field. If you want install the Scriptcase, follow the tutorial: https://help.scriptcase.net/portal/en/kb/articles/how-to-install-and-access-scriptcase-in-your-hosting-account If you want realize the publication, follow the tutorial: https://help.scriptcase.net/portal/en/kb/articles/how-to-perform-a-publication-in-your-hosting-service To others procedures, you can consult the knowlogment base: https://help.scriptcase.net/portal/en/kb/hosting If you want the technical support, you can get in touch with us at www.scriptcase.host or client.scriptcase.host. (PS: All the information used in this tutorial was fictitious, you have to use the real register informations.)
How to update your contact informations
If you want to receive notifications about your service status or want to update your cPanel contact information, follow these steps. 1. Login to your cPanel account. In the "Preferences" section, click on "Contact Information" icon. 2. Fill in a email account to receive notifications, this should be an email address that is not on your account if you have one. Update your existing email address or add your secondary email address in the second email input box. 3. Select the options of notifications that you would like to receive and Save.
How to change my cPanel account password?
If you can access your cPanel account, follow these steps to reset your password: 1. Log into your cPanel account. 2. In the "Preferences" section, click on "Password & Security" Icon. 3. Enter your current password. 4. Enter your new password or use a password generator. 5. Click on change password. You will see a sucess message then it means your password is changed, Log out and access your account using your new password.
How to block any IP address
You can block any IP address by add this line to your .htaccess file: 1. order allow,deny 2. deny from IP-ADDRESS 3. allow from all Replace "IP-ADDRESS" with the IP Address you want to block.
How to change the timezone of your host?
To change the time zone of your hosting, you can follow these steps: 1. Access the cPanel: 1. Log in to your cPanel account. 2. Locate the PHP Selector: 1. Find and click on "Select PHP Version" or "MultiPHP Manager," depending on the version of cPanel you are using. 3. Select the PHP Version: 1. If you clicked on "Select PHP Version," choose the PHP version in use and click on "Options." 4. Configure date.timezone: 1. In "Select PHP Version," scroll down until you find the date.timezone option. 2. If you are in "MultiPHP Manager," go to the PHP settings section and look for date.timezone. 5. Set the Time Zone: 1. Set the value of date.timezone to the desired time zone. For example, for Recife's time zone, you would set it to America/Recife. 6.Save the Changes: 1. After making the change, make sure to save the settings. Time Zone Examples Here are some examples of time zones you can use: 1. America/Recife - Recife 2. America/Sao_Paulo - São Paulo 3. America/New_York - New York 4. Europe/London - London 5. Asia/Tokyo - Tokyo If you need more details about supported time zones, you can check the list of time zones in PHP. Verification To ensure that the change was applied correctly, you can create a simple PHP file that displays the current date and time. For example: When you access this file through your browser, it should show the date and time in the configured time zone.
How to restrict Directory Access by IP address
In order to secure your "admin area" from hackers, we recommended you to allow access only from your selected IP to your admin directory. You just need to create an .htaccess file in the directory where you want to restrict access by IP Address. For example, if you have a WordPress blog installed on your main directory like example.com/wp-admin, you should create an .htaccess file in /wp-admin/.htaccess and you should put this code in, and not forget to replace the allowed IP address with your IP address. - order deny,allow - deny from all - allow from IP-ALLOWED (Replace "Your-IP-Address-Here" text with your IP Address) You can test this by accessing **your-domain/wp-admin,**from an IP address other than the one allowed by your .htaccess file.
How to disable directory browsing
For security purposes, we recommend that you disable navigation in the directory on your website so that you cannot see the files/pastes of your website. First you need to access your cPanel Step 1 After accessing your cPanel, go to the Files section and search for the item "File Manager" Step 2 You can disable navigation in the directory in question by adding the line below to your .htaccess file: 1. Options -Indexes Next, you will see this other fabric: Then just click on Save to change, on the top edge directly of your fabric. Step 3 If you cannot find your .htaccess files, they may be set to "hidden files" and just check the option to show hidden files in your manager, following these steps: Go to the top bar of the file manager and click on "Settings" A Janela will be open, just check the option to Show hidden files I hope it helped you!
How to protect .htaccess file?
For security reasons, we recommend that you prevent unauthorized access to your .htaccess file. To do this, you need to understand how to find this file. You can edit the .htaccess file using an FTP client or using cPanel. Add security code to .htaccess file Step 1: Log in to your cPanel account and open “File Manager” in the Files section. You must have made the correct settings to show hidden files. Because the .htaccess file is a hidden file with a dot prefix; It means you can see it if you haven't turned it on to be visible. Step 2: You should look for ".htaccess" in the public_html directory. Right click to edit the file and click Edit. Step 3 Add this code: 1. .htaccess protection 2. order allow,deny 3. deny from all 4. satisfy all Click the "Save Changes" button displayed in the upper right corner. This code will restrict unauthorized access to your .htaccess file.
How to connect a FTP account
After create a FTP account you can access your FTP Account by using your newly-created FTP account in some FTP manager or connection. Host/Server: The domain of your hosting service or the server domain. Username: Enter the FTP account username FTP Password: The password of the FTP User. FTP Port: 21 (Default port is 21). (You can also use your main service user in connections, with port 21 or 22). 1. If the connection is successful, you will see the list of directories on the FTP server in the right panel of FileZilla and the local directories in the left panel. 2. If there is any problem connecting, FileZilla will provide detailed error messages that can help diagnose and resolve the issue. 3. Make sure that your computer's firewall or security software is not blocking the FTP connection.
How to create a file in File Manager
1. Log into your cPanel account. 2. In the "Files" section, click on the "File Manger" Icon. 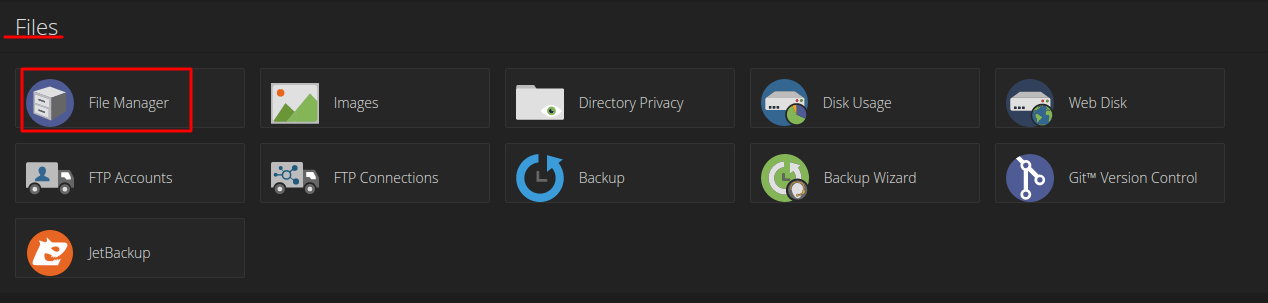 3. Navigate to directory path you want and click on the "File" Icon. 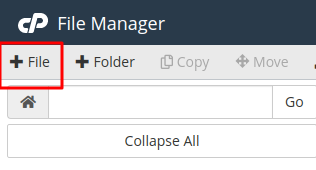 4. In the "New Filename Field" enter your filename like "MyFile.txt" (without the quotes). Then click on the "Create New File" button. 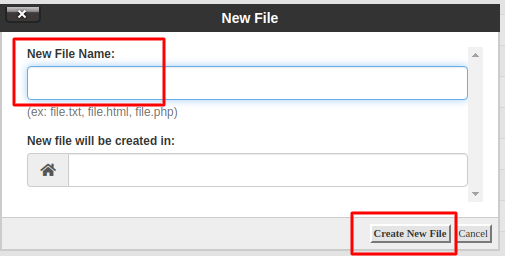
How to create a FTP account
You can use your cPanel username and password to access all folders and files via FTP. However, if you want to create an FTP user account for a specific folder or do not want to allow access to your root files, you can create a separate FTP account. 1. Log in to your cPanel account. 2. In the "Files" section, click on the "FTP Accounts" icon. 3. Under "Add FTP Account" fill in the following details: Login: In this field, you determine the name to be used for FTP access, for example, "test" (without quotes and spaces). Password: Enter the new FTP password or generate a new password by clicking the "Password Generator" button. Directory: Set which directory the new account can access. You can grant access to the entire /public_html folder by typing "public_html," or change the folder path to a different path such as "public_html/test." Then, your FTP user will only have access to the "test" folder. Your FTP user also won't be able to access folders outside of the "public_html/test" folder. Quota: Specify the usage quota for this user or select "Unlimited." 4. Click the "Create FTP Account" button. 5. Then a message indicating that the account has been created will be displayed.
How to edit a file in FIle Manager
1. Log into your cPanel account. 2. In the "Files" section, click on "File Manger" Icon. 3. Navigate to the directory where your file is located and right click on the file and then click on "Edit"" in the Context Menu. 4. If the small "Code Editor" window is open, click on the "Edit" button, which will open a new window with options you can edit. 5. Make changes to your file and then click on the "Save Changes" button. I hope it helped you!
How to use File Manager and upload a file
If you don't want to use a 3rd party FTP Software, you can use the cPanel's inbuilt File Manager. 1. Log into your cPanel account. 2. In the "Files" section, click on the "File Manger" Icon. 3. Once in File Manager interface, navigate to the directory where you want to upload your files to. For example, should you wish to upload your file to the public html folder, you need to go to /public_html first. On the left side you can see a list of directories. Double Click on the "public_html" folder. 4. Now click on the "Upload" icon. 5. Click on the "Select File" button and select the file you want to upload from your PC. After you have select the file, the upload process will begin automatically.
How to perform a database restoration with Jetbackup
JetBackup is a powerfull plugin made for cPanel that allow you make backups of your hosting account, in this tutorial we are going to perform a database restoration with Jetbackup. Once you are logged in cPanel. Just follow those steps: 1. Once on cPanel home screen go to JETBACKUP section and click on Database Backups icon. 2. Under Database Backups select a DB with the date of backup do you want restore and click in Restore icon. 3. A warning message will appear in the screen, you have to accept the terms and conditions, so click in Restore to proceed. Wait some time while the restauration is being done. You can check the progress of this procedure at JetBackup queue.
How to perform a restoration of Folder and Files with JetBackup
JetBackup is a powerfull plugin made for cPanel that allow you make backups of your hosting account, in this tutorial we are going to perform a restoration of Folder and Files with JetBackup. Once you are logged in cPanel. Just follow those steps: 1. Once on cPanel home screen go to JETBACKUP section and click on File Backups icon. 2. Under File Backups select a date of backup do you want and click in File Manager icon. 3. Under File Manager select a folder(s) and/or file(s) do you want restore and click in Restore Selected Filesicon. 4. A warning message will appear in the screen, you have to accept the terms and conditions, so click inRestore to proceed. Wait some time while the restauration is being done. You can check the progress of this procedure at JetBackup queue.
How to perform a restoration of a CronJob with JetBackup
JetBackup is a powerfull plugin made for cPanel that allow you make backups of your hosting account, in this tutorial we are going to learn how to perform a restoration of a CronJob with JetBackup. Once you are logged in cPanel. Just follow those steps: 1. In cPanel home screen go to JETBACKUP section and click in Cron Job Backups icon. 2. Under Cron Job Backups select a backup with the date do you want restore and click in Restore icon. 3. A warning message will appear in the screen, you have to accept the terms and conditions, so click inRestore to proceed. Wait some time while the restauration is being done. You can check the progress of this procedure at JetBackup queue.
How to perform a restoration of Email Accounts with JetBackup
JetBackup is a powerfull plugin made for cPanel that allow you make backups of your hosting account, in this tutorial we are going to perform a restoration of Email Accounts with JetBackup. Once you are logged in cPanel. Just follow those steps: 1. Once on cPanel home screen go to JETBACKUP section and click on E-mail Backups icon. 2. Under E-mail Backups select a backup of a email account with date of a backup do you want restore and click in Restore icon. 3. A warning message will appear in the screen, you have to accept the terms and conditions, so click inRestore to proceed. Wait some time while the restauration is being done. You can check the progress of this procedure at JetBackup queue.
How to receive JetBackup notifications
JetBackup is a powerfull plugin made for cPanel that allow you make backups of your hosting account, in this tutorial we are going to learn how to receive notifications about any procedure with JetBackup. Once you are logUma vez que você está logado no cPanel, basta apenas seguir esses passos: Once you are logged in cPanel, just follow those steps: 1. Once on cPanel home screen go to JETBACKUP section and click on Settings. 2. On Settings, select the field Notification Email, Fill out an email account to receive notifications and click the Save Changes button..
How to perfom a Full Account restoration with JetBackup
JetBackup is a plugin made for cPanel that allows you to make backups of any part of your hosting account. In this tutorial we are going to learn how to perform a full account restore with JetBackup. After logging into your cPanel, just follow these steps: From the cPanel home screen, go to the "Files" section and click on the "Jetbackup" icon. Then select the Full backups option for a full account restore. Now just choose the day of the account you want to restore. After choosing the day, click on "Restore" then the message check the box next to it and then click on "Add to Restore Queue." Wait some time while the restore is being done. You can check the progress of this procedure in the "Queue" option of JetBackup.
How to restore Firebird backup from the terminal?
To restore the backup of your Firebird database, you must first access the Terminal through the cpanel in "Advanced" and then click on "Terminal". Once you have the Terminal open, you will enter the following commands: 1. gbak -user YOUR_USER -pas YOUR_PASSWORD -r -p 8192 -o 2. /home/SEU-USER/firebird/YOUR_BACKUP.FBK localhost: 3. /home/YOUR_USER/firebird/YOUR_NEW_BANK.FDB Note: The command mentioned above is for examples only, substitute where you have "YOUR_USER", "YOUR_PASSWORD" and "YOUR_NEW_BANK" for your respective name. - To upload the file you can check out this tutorial.
How to see the JetBackup queue
JetBackup is a powerfull cPanel plugin that allow you to manage backups of your hosting account. In this tutorial we are going to learn how to see the JetBackup queue after performing a backup procedure. Once you are logged in cPanel, just follow those steps: 1. In cPanel home screen go to JETBACKUP section and click on Queue icon. This screen will list all the backups and restorations with JetBackup.
How to perform a restoration of a DNS Zone with JetBackup
JetBackup is a powerfull cPanel plugin that allow you to manage backups of your hosting account, in this tutorial we are going to learn how to restore a DNS zone wih JetBackup. Once you are logged in cPanel. To perform a restore of a DNS Zone just follow those steps: 1. In cPanel home screen go to JETBACKUP section and click on DNS Zone Backups icon. 2. Under DNS Zone Backups select a domain and date of backup do you want restore and click in Restore icon. 3. A warning message will appear in the screen, you have to accept the terms and conditions, so click inRestore to proceed. Wait some time while the restauration is being done. You can check the progress of this procedure at JetBackup queue.
How to perform a restore of a SSL Certificate with JetBackup
JetBackup is a powerfull cPanel plugin that allow you to manage backups of your hosting account, in this tutorial we are going to learn how to restore a SSL Certificate with JetBackup. Once you are logged in cPanel just follow those steps: 1. In cPanel home screen go to JETBACKUP section and click on SSL Cert Backup Icon. 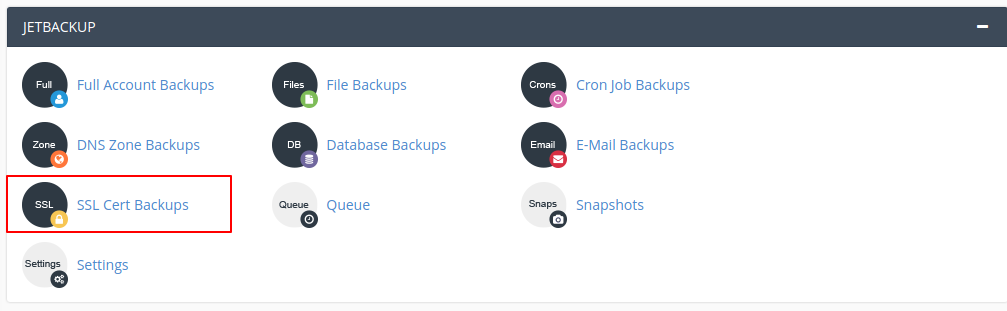 2. Under SSL Cert Backup select a domain and date of a backup do you want restore and click in Restore. 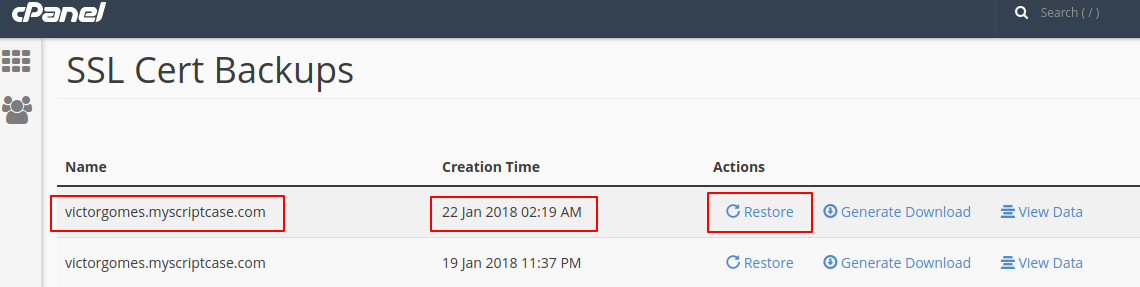 3. A warning message will appear in the screen, you have to accept the terms and conditions, so click in Restore to proceed. 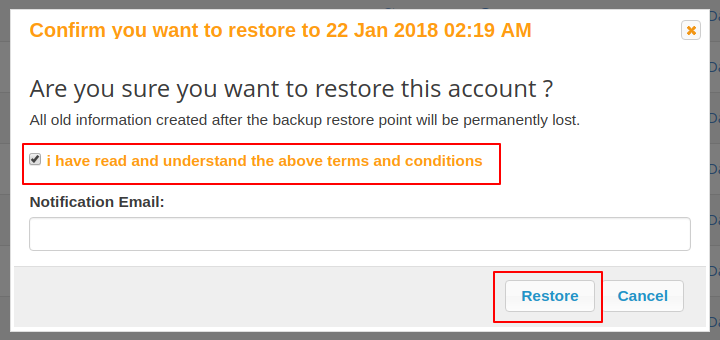 Wait some time while the restauration is being done. You can check the progress of this procedure at JetBackup queue.
How to create a table in PhpMyAdmin?
To create a table in phpMyadmin, you must first access phpMyadmin through cPanel. - Click on the database you want to create the table, which is located on the left side; - Now click on "Create table", type the name of the table and the number of fields, and click "Run"; - One of your fields should be increased automatically. We normally use this field as the requested line identifier (ID). In this field you must fill in the following: 1. Name; 2. Type INT (Integer); 3. Size (number of houses your whole number will have); 4. PRIMARY index; 5. Check the box "A.I." (so that the field is automatically incremented). The other fields can be text with a character limit (VARCHAR, 255). In addition, you can place other types of fields, depending on the data that will be included in that field. - After filling in all the data, just click "Save"; - It will be displayed in the created table.
How to export your database in phpMyAdmin?
To export your database on phpMyadmin, you must access phpMyadmin through cPanel. - You must choose the database you want to export. - Click on the MySQL database you want to export, it is located on the left side, as shown in the following image: - When you are in phpMyAdmin to export your database you must click on the "Export" button, which is located at the top of the page. - Now choose the "Export Method". - Fast - show only minimal options. - Custom - display all possible options. In this option you can choose several configurations, such as: Tables, Output, Format specific options, option to create objects and data creation options. - After all the necessary configurations have been made, click on the "Run" button. - The download will start.
How to change database charset - MySQL
To change the MySQL charset, follow these steps: 1. Access the cPanel: 1. Log in to your cPanel account. 2. Access phpMyAdmin: 1. In cPanel, find the "Databases" section and click on "phpMyAdmin". 3. Select the Database: 1. In phpMyAdmin, on the left panel, click on the name of the database whose charset you want to change. 4. Change the Database Charset: 1. Click on the "Operations" tab. 2. In "Collation", select the desired charset from the dropdown list (e.g., utf8_general_ci for UTF-8). 3. Click on "Go" to apply the change. 5. Change the Table Charset: 1. Return to the left panel and click on the name of each table for which you want to change the charset. 2. Click on the "Operations" tab for each table. 3. In "Table options", select the desired charset from the "Collation" dropdown list. 4. Click on "Go" to apply the change for each table. 6. Change the Column Charset: 1. To change the charset of specific columns, click on the "Structure" tab of the table. 2. Next to the desired column, click on "Change". 3. In the collation field, select the desired charset. 4. Click on "Save" to apply the change. By following these steps, you can effectively change the charset of your MySQL database through phpMyAdmin.
How to create a VIEW in phpMyAdmin?
To create a View in phpMyadmin, you must first access phpMyadmin through cPanel. 1. Click on a table, it is located on the left side, as the following image: 2. Then you click on "View". 1. Then "Create View". 3. You will be presented with a form to insert some information to create the View, you must inform: 1. View Name 2. Column Name - Define the column names of the View, use commas to separate them. 3. View Query - which will select the values that the VIEW will return. 1. After filling in the data click on "Go", and Views is ready.
How to create Procedure in phpMyAdmin?
To create a Procedure in phpMyadmin, you must first access phpMyadmin through cPanel. 1. Click on your database which is located on the left side, after that, click on "Routines". 1. Then click on "Create new Routine". 1. Fill in the data and parameters and click "Run". 1. After that, the created Procedure will be displayed, as shown in the following image:
How to import a database in PhpMyAdmin?
Step 1 1 - In cPanel, go to “PhPMyAdmin”; Step 2 In the top bar of your PHPmyadmin click on "Import"; Click the "Choose File or File" button and select your database (.sql); Step 3 Then correctly define the settings you want for import as in the image Finally, click on the "import" button. Hope this helps !
How to access PhpMyAdmin in your hosting?
When hosting with Scriptcase, phpMyAdmin is already installed as standard, you just need to access it through cPanel. See how to access cPanel : Aqui phpMyAdmin is a SQL database manager where you can make changes to your database. - Through cpanel you go to "Database", then click on "phpMyAdmin", and you will be directed to the phpMyAdmin page. (no username or password is required to log in). - You will be redirected to the phpMyAdmin screen. Hope this helps !
Error "The SELECT would examine more than MAX_JOIN_SIZE rows; check your WHERE and use SET SQL_BIG_SELECTS=1 or SET SQL_MAX_JOIN_SIZE=# if the SELECT is okay"
This error occurs when the database needs to search on more than 1 million rows to meet he requirements of your query. This limitation does not concern the number of records in a table,but rather how many records will be read to satisfy a query, so in a table without proper optimization mysql can make multiple queries to fit the result of a query, addition of indexes, causes mysql to scan fewer records. - To solve the error in question: Optimize your query and also create index in your tables, thus increasing the performance of your database.
Import a CSV file to MYSQL in PHPMYADMIN
Step 1 First you must access your cPanel and go to the "phpMyadmin" item in the Database Section; Step 2 - In PHPMyAdmin, go to the menu "Import"; Step 3 - Select CSV format Step 4 - Click "Choose file", and search for local file and select CSV format; - Click in Import; - A confirmation screen will be displayed. Hope this helps !
How to remove a domain or subdomain redirection
1. Log into your cPanel account. 2. In the "Domains" section, click on "Redirects" Icon. 3. Scroll down to the end of page and under "Current Redirects" locate the domain and click on the "Delete" icon. 4. For confirmation click on the "Remove Redirect" button once more. Check if the redirection was succesfully removed in Current Redirect list.
How to remove Parked(alias) Domain in cPanel
1. Log into your cPanel account. 2. In the "Domains" section, click on "Aliases" Icon. 3. Under "Remove Alias", locate the parked domain name and click on the "Remove" . 4. For confirmation you will need to click on the "Remove Alias" button once more. You should see a success message that your Parked Domain is removed.
How to remove a Subdomain
1. Log in to your cPanel account. 2. In the "Domains" section, click on the "Domains" icon. 3. Locate the domain under "Manage". 4. Then, click on the "Remove Domain" icon. 5. Click the "Yes, Remove This Domain" button. You should see a success message notifying you that your addon domain has been completely removed.
How to remove an addon domain
1. Log in to your cPanel account. 2. In the "Domains" section, click on the "Domains" icon. 1. Locate the domain under "Manage". 1. Then, click on the "Remove Domain" icon. 1. Click the "Yes, Remove This Domain" button. You should see a success message notifying you that your addon domain has been completely removed.
How to change the DNS to Scriptcase Host
To change the DNS for the Scriptcase host, follow these steps: 1. Access the domain's DNS settings: - Log in to the control panel of the provider where the domain is registered (e.g. Registro.br, etc.). 2. Locate the DNS or DNS Zone section: - Look for something like "Manage DNS," "DNS Settings," or "DNS Zone." 3. Add or edit the DNS records: - Identify the DNS records that need to be changed. - Our NS servers are: - ns1.myscriptcase.hostns2.myscriptcase.hostns3.myscriptcase.hostns4.scriptcase.hostns5.scriptcase.host 4. Save the changes: - After making the changes, save the settings in the panel. 5. Wait for DNS propagation: - Changes may take up to 24 hours to propagate globally, though they often happen much faster.
How to prevent your email from being classified as Spam
There are several reasons why emails may end up in the spam folder and understanding them is essential to ensure proper delivery. Here are the main ones: Why do some emails go to the spam folder? There are several common reasons: 🔐 1. Missing domain authentication (SPF, DKIM, DMARC) If your domain doesn’t have proper SPF, DKIM, and DMARC records configured, receiving mail servers may not trust your email, sending it to the spam folder. 📝 2. Suspicious content or spam trigger words Using terms like “free,” “promotion,” “urgent,” “click here,” or “easy money” — especially in the subject line — can trigger spam filters. 📤 3. Bulk sending from a domain with poor reputation If you're sending many emails at once and your domain or IP lacks a good sending reputation, the emails may be flagged as spam. 🔗 4. Use of shortened or untrusted links Including links from services like bit.ly or suspicious domains can raise red flags for spam filters. ✉️ 5. Poor formatting or generic content Emails with only images, no proper signature, or generic, templated text often look like spam to email providers. ⚠️ 6. Sending server issues If the sending server is misconfigured or its IP address is listed on blacklists, emails are more likely to land in spam. ✅ How to avoid spam filters: - Set up SPF, DKIM, and DMARC records. - Use clear, professional subject lines. - Avoid spammy words and formatting. - Add a proper email signature and sender info. - Make sure the sending server’s IP is not blacklisted. - Test your emails using tools like: - Mail Tester - MXToolbox
Authenticate an email account in the Gmail WEB
You can use an email account of your hosting in Gmail WEB. To do this, you can just follow this steps: ## Step 1: Add the email account in Gmail. 1. Open the Gmail in the computer. 2. In the top right corner, click in Configurations. 3. Click in the Account and Importation or Account option. 4. In the section "Send e-mail as", click in Add another email address. 5. Type you name and the address with which want to send messages. 6. Click in Next Step. 7. Insert the SMTP Server: Server/Host address: mail.SeuDomínio Porta SMTP: 465 8. Click in Add account. ## Step 2: Confirm the Address 1. Sign in to the account you added. 2. Open the confirmation message you received from Gmail. 3. Copy and paste the verification code that was sent to your email.
How to Park(alias) a Domain in cPanel?
Note: Before parking a domain, First you need to update name server of your domain you want to park to your main domain name server. 1. Log into your cPanel account. 2. In the "Domains" section, click on "Aliases" Icon. 3. Under "Create a New Alias" you should enter a valid domain name you want to park in the text field and click on the "Add Domain" button. You should see a success message that your alias was successfully created. 4. In the section "Remove Alias" click in "Manage Redirection". 5. In the next screen fill in the address do you want to redirect and save. 6. Back to "Remove Alias" section to check redirection.
How to add a domain in your hosting service
If you already have a registered domain, you can use it in your hosting service by following the steps below. Step 1: Check support for adding domains Make sure your hosting plan allows adding domains. Consult your hosting provider to confirm. Step 2: Access the cPanel 1. Log in to the cPanel of your hosting service using your credentials. 2. Locate the section called Domains and click on the option "Domains". Step 3: Create a new domain 1. On the domains page, click the "Create a New Domain" button, usually highlighted in blue on the right side. 2. Enter the desired domain without the www prefix (e.g. yourdomain.com). Other fields, such as the subdomain and document root folder, will be filled in automatically. - If you need a custom configuration, you can edit the fields manually. 3. Click "Submit". - Once created, a success message will appear, and the domain will be listed among your domains. Step 4: Update the domain DNS If the domain was purchased outside of Scriptcase-Host, you must access the domain configuration panel at the registrar where it was purchased and change the name servers (DNS). Update the DNS to the following values: ns1.myscriptcase.host ns2.myscriptcase.host ns3.myscriptcase.host ns4.scriptcase.host ns5.scriptcase.host Important: If the domain was purchased directly from Scriptcase-Host, this step is not necessary as the DNS will be configured automatically. Final Tips - Wait for DNS propagation, which can take up to 24 hours to complete. - Check if the domain is working correctly by accessing it in your browser. - If you encounter any issues, contact our hosting support team.
How to use GMAIL SMTP in hosting applications
To allow sending email through domains on the web by gmail it is necessary to perform the steps below: 1 - Access the item https://myaccount.google.com/lesssecureapps , to allow the login from less secure applications . 2 - Access https://myaccount.google.com/security , to verify that the options "use your smartphone to login" and "two-step verification" are disabled. 3 - Access https://accounts.google.com/DisplayUnlockCaptcha , to enable the gmail option not to block login from new devices. 4 - After clicking "Continue", access is allowed.
How to change the password of a email account
If you want to change password of your email account then you can do this by the following steps: 1. Log into your cPanel account. 2. In the "Mail" section click on "Email Account" Icon. 3. Scroll down to the "Email Accounts" section and you should see your email account listed there. 4. If your email address is server@example.com, you should see a "Change Password" text in front of your email. Then simply click on "Change Password". 5. Enter your new password or use a password generator 6. Click on the "Change Password" button. Congratulations, your email password has been successfully changed and now you can access your email using your new password!
How to forward emails
Step 1: Login to your cPanel account. Step 2: In the "Mail" Section of your cPanel, click on "Forwarders" and then click on "Add Forwarders". Step 3: On the "Add a New Forwarder" page you will see the "Address to forward" field. If you want to forward your myemail@example.com to your custom e-mail address, enter "myemail" (without the quotes) in the "Address to forward" field, and should you have multiple domains, select the appropriate one from the domain drop-down list. Step 4: From the "Destination" field select "Forward to email address" and enter your customer e-mail address on which you want to receive forwarded emails. Final Step: Click on the "Add Forwarder" Button. How to forward email to a mail pipe script/program? 1. If you want to forward your email to an e-mail pipe script like myemailpipe.php, which is located on your public html folder like "/home/username/public_html/myemailpipe.php", follow Step 2 and Step 3. 2. In the "Destination" field click on "Advanced Options" to expand them, select "Pipe to a program" and enter the full path of your custom email pipe script such as "home/username/public_html/myemailpipe.php" (Without the quotes, and you may have noticed that we do not use a slash at the beginning of the url.) 3. Click on the "Add Forwarder" Button.
How to reset the password of your email account
Through the cpanel access "Email > Email Accounts". Choose the email you want to change your password, and click "Manage". Now you can fill in a new password, or click on "Generate" so that the system generates a new password. And click "Update Email Settings" to save your new password.
How to setup a email client with a hosting email account
This tutorial was made using outlook 2016 as client, but the information can be used in any client, like Evolution, Thunderbird. 1. Open your outlook to set up a new account. 2. Check the checkbox option below to define the server settings manually. 3. Choose to set up and email with IMAP. 4. Fill the fields with the information from our server: Check and select all options like "Server require authentication (SPA)" for IMAP and SMTP Click in next and type your password. Click in Done. Your email is now ready:
How to use the emails of hosting account with a external SMTP server
Step 1 1. Log in to your cPanel account. In the "Domains" section, click the "Zone Editor" icon. 1. From the list of domains, select the appropriate domain and click "MX Record". Step 2 1. On the next screen, fill in the SMTP server address you want to use. Step 3 1. Next, you need to change the type of email sending server, accessing the "Email routing" item. Here. After access, follow the steps indicated below. - Selecting the desired domain and changing its configuration to the "Remote mail exchanger" option. - Congratulations! Your MX records are now configured to point to another SMTP server. - Remember that changes to MX records may take up to 48 hours to take effect. Hope this helps !
How to create a autoresponder email
With this item it is possible to configure automatic responses for all emails received, ideal for confirming receipt, informing travel periods, for example. Firstly, let's access your cPanel panel. Step 1 After accessing cPanel, go to the Email section, there look for the item 'Automatic responders' Step 2 On this screen you can create a new respondent by clicking on 'Add automatic respondent' or add an existing respondent where the 'Current respondents' option is displayed. Step 3 To add a new respondent, you must now configure the settings for sending the automatic response: Character set: UTF-8 is defined by default Range: According to your needs. E-mail: The e-mail that will be registered for the automatic response. Domain: The domain from which you will create the responder. From: Name of person responsible for the email. Step 4 Now define when it starts: Start: With options to activate immediately or customize a start date. Stop: With options to deactivate immediately or customize a deactivation date.
How to access your email account from Webmail
You can access your email account directly from Webmail in your browser. Step 1 1. Open your browser and type "Your_domain/webmail" or "webmail.Your_domain". Replace "Your_domain" with your domain name. Step 2 On the login screen, enter your full email address and password, then click the "Login" button. Step 3 You will be redirected to a cPanel webmail page. Now you must select the email manager, like "Roundcube" for example. Once your Webmail Email Reader is opened, you can read your email and check your email inbox and junk mail. Hope this helps !
How to check Bandwidth Usage?
1. On section " Metrics ", select the icon " Bandwidth ". 2. Scroll down to the bottom of the page and you can see the bandwidth usage on a graph.
How to perform a publication in your hosting service?
If you already know how to implement applications with Scriptcase RAD, you can publish your applications generated with your Scriptcase in your hosting account. Step 1. Upload the app to your hosting account - From an unhosted Scriptcase: - First, let's access cPanel, see how to access cPanel in: https://help.scriptcase.net/portal/pt/kb/articles/primeiros-passos-com-a-hospedagem-acesso - Go to "File Manager" in cPanel. - Now you must select "public_html" before doing this upload - Select the .tar or .zip file for your hosting service in the public_html directory or subdomain with cPanel file manager. Then extract the .zip or .tar file to that directory. You can also transfer the application with the integrated FTP client directly from your Scriptcase without generating any .zip or .tar file. - If Scriptcase is hosted on the same account that you want to publish your applications: You can deploy with the "Deploy to a Server Directory" option. (How to use FTP connections and file manager Here). step 2**.** Create database, user and add user to database, give privileges and restore database contents. (Hosting database tutorials Here). Step 3. After that, open the application in a browser using your account domain plus your application directory, such as: schost.myscriptcase.com/crm to create the application's connection to the database. Now your application is ready for production.
How to access your account with SSH
You can access your host account by SSH connection. To do that you just have to access via terminal using your username and the main domain or the shared IP of your account: 1. ssh user@mydomain.com or 1. ssh user@yoursharedip And then you just have to enter with your password (the same used to access cPanel). If the mensage "The authenticity of host 'domain.com* (ip)' can't be established.* ECDSA key fingerprint is SHA256:yEq2fYG6FxwUsP5brofy6hMDDCLhbqXla2AzIpC9sdo. Are you sure you want to continue connecting (yes/no/[fingerprint])?" appears, you just have to answear yes. For example: The informations used in this example are fictitious. You must use your own data when connecting.
How to upload a firebird database to your hosting acount
If you already have a Firebird database and want to upload it to your hosting account, just follow these steps: Step 1 1. Save/export your local database with the user that accesses your hosting. The password must contain exactly 8 characters, you can define it through the "Firebird Databases" item, see; Here Note: You must grant all privileges to the user before uploading it to hosting, you can use the GRANT command. For example: Step 2 You must also adjust all database, table, view and procedure permissions. To do this, you can use the commands below, replacing USUARIO_FIREBIRD with your Firebird hosting user. 1. 2 3 Note: After executing each command, you must copy the displayed returns and execute them in your database. Step 3 1. Upload your database to the hosting. You can do this through your cPanel in the File Manager item. 2. Create a folder named Firebird. After creating or if the folder already exists, you must change the folder permissions to 777. To do this, simply right-click on the folder and go to the "Change Permissions" option. Now your database file is ready to be uploaded. Simply go to the Upload option at the top of your screen. Then just drag your file and wait for the upload to complete. 4. Access the database through a database manager or application using the data: Host/Server: The main domain of your hosting. Path: the full path to the database location, example: /home/user/firebird/db.fdb Port: 3050 User: cPanel user of your account Password: password defined in the “Firebird Databases” item. Hope this helps !
How to check your hosting disk space
The use of your disk space adds up to all files and data in your hosting account, this includes databases, website files, and email accounts. Warning emails will automatically be sent when it is close to reaching 100% of disk capacity. Where to check disk usage: First, let's access cPanel. See the steps to access the cPanel at: https://help.scriptcase.net/portal/en/kb/articles/first-steps-with-the-hosting-access 1st You can check in the right corner in the “Static” section. 2nd To check the complete details with more information, just click on the option "Disk usage" in the "Files" section. By clicking you will see a table with all the information about the size in (MB) of the files that are taking up your account's disk space. Conclusion: Now you know how to check your hosting account's disk space usage. In case you want to know which file is taking up a lot of space in your account.
How to create a Web Disk account
Create a Web Disk account to manage, browse, upload and download files to the web server. The Disco Web account directories exist in relation to your account's home directory. The home icon means your home directory (“/ home/Your_cPanel_User”). This method uses the secure connection to create a folder on your webserver directly on your desktop. By default your Cpanel user already has an account, just activate: The next part will select your operating system and the version you want. As soon as it is selected it will open the information, then just click on download. A file will be downloaded, just click on it and wait for the folder to open. Simply enter your Cpanel username and password to log in. See how to obtain credentials and access cpanel through our article: https://help.scriptcase.net/portal/en/kb/articles/first-steps-with-the-hosting-access There, now you have quick access to all your web content.
How to create and change the Firebird password
In this example, we will show you how to create and change the Firebird database password. First you must access your cPanel: See how to obtain credentials and access cPanel through our article: Here Within cPanel, you must click on the item "Firebird Databases". On the next page, under “Change Password”. Note: The password must be exactly eight characters long. Hope this helps !
How to connect to firebird database on hosting
In this example, we will show you how to connect the Firebird database. First you must access a database manager. Enter the information according to the image below. Host/Server: Your hosting domain. Path: the full path to the bank location, example: /home/user/firebird/db.fdb Port: 3050 User: cpanel user of your account Password: password defined in the item “Firebird Databases”. See how to create a password, through our article: Here
How to create firebird database on your hosting
In this example, we will show the creation of a Firebird database. First you must access your cPanel: See how to obtain credentials and access cPanel through our article: https://help.scriptcase.net/portal/en/kb/articles/first-steps-with-the-hosting-access Inside cPanel, you must click on the item "Firebird Databases". On the next page, you must enter the name of the bank you want to create. See that the bank has already been created, on the side you can see the size of the bank. The password must have exactly eight characters and must be entered in cPanel, in the item "Firebird Databases". See how to create a password, through our article: https://help.scriptcase.net/portal/en/kb/articles/how-to-create-and-change-the-firebird-password
Cron Jobs
Use cron jobs to automate certain commands or scripts on your website. Typically a cron task has a series of simple tasks that the system runs from a script file. 1. Notice: You need to have a good knowledge of linux knowledge to use works cron successfully. Check the script with your hosting administrator before adding one cron work. 2. Notes: When scheduling scheduled tasks, if scheduled to run heavily often, they can degrade performance. Most scripts that need a cron job will give you instructions on the proper settings of it. When in doubt, check with your script author before insert a new cron job. 3. **Cron Email:**Enter an email address for the system to send notifications whenever your tasks cron runs. Common Settings: Select the time interval you want the cron job to run. Minute: Minute of each hour you want the run or the number of minutes between each run. Time: The time of each day you want to run the cron job, number of hours between each run. Day: Day of the month you want to run or number of days between each run. Month: Month of the year you want to run the cron job or number of months between each run. Weekday: Select the days of the week on which you want to run the cron job. In the Command text box, enter the command to be executed. Specify the absolute path to the command to run. for example you want to run the file "public_html/example.php" in your home directory. ex:
GLOBAL EMAIL FILTERS
Global Email Filters is a cPanel feature that allows you to manage how the system handles emails received from a particular domain. Step 1 - 1. In your cPanel select “Global email filters”. You will then be redirected to the page below which will list your filters (if any) and allow you to "Create a new filter". Step 2 - 1. This filter will be applied to all emails in your account. Each filter must have a unique name so that the system can process it. The first configuration of the “From” filter is to indicate which rule or rules will be processed. The second configuration of the “Contains” filter mentions how the selected term will be analyzed in the message. - Step 3The “+” and “-” buttons in the right corner are for adding more rules and/or actions to be processed for the same filter. And finally, just click on “Create”. - - Note: The item also gives you tips for using the filters, see the image: Hope this helps !
Indexes
The Indexes feature allows you to adjust the folder file listing permission for the web. 1. Logged into your cPanel, select "Index". Then you will be directed to the list of folders of your hosting. You can browse them by name of each one next to the folder icon. Once you find the folder you want to change, click “Edit” on the right side; Here, you can choose between four options: Default System Configuration; Finally, after choosing the desired configuration, click on Save; NOTE: If you prefer, it is also possible to use the File Manager, right-click on the desired folder/file and select the “Manage Indices” option. This option will redirect you to Indexes.
Directory Privacy
To create protection for a directory of your hosting with a Username and Password, follow the steps: 1. In your cPanel, select "Directory Privacy" in the Files section. Then select the directory you want to assign privacy to. 2. Complete the fields as desired. Remember to check the option "Password protect this directory". After the creation of the first user, the list of created users will be available in this directory, where you can monitor all created users. When accessing the Directory Privacy option again, there will be a padlock symbol next to the folder you have set up protection. You can also change the Directory Privacy settings under “Settings” in the upper right corner. 3. There you can change the base directory to a subdomain, for example, and customize it so that this new option is always opened in the next accesses to the Directory Privacy.
Email Disk Usage
First you must access your cPanel: See how to obtain credentials and access cPanel through our article: https://help.scriptcase.net/portal/en/kb/articles/first-steps-with-the-hosting-access 1. Logged into cPanel, in the email tab, Select Email Disk Usage; In “account”, select the email you want to manage; Choose the box/folder you want to manage and click on “Manage”; 2. You must now select one of the options below; 3. Then click delete permanently.
Visitors
Detailed information about the most recent 1,000 visits to your website is displayed here. This information helps you learn more about your audience and monitor the frequency of visits to your domain in a way that helps you adjust your content to suit their needs. It also helps you locate errors such as missing pages or broken links. 1. After accessing cPanel, in the Metrics tab, select "Visitors". 1. To view details, select a domain, click the magnifying glass icon. By default, the interface displays the following information: Additional Information Press the gear icon to select the following additional data display: To search for additional information, enter your search criteria in the search box in the top left corner.
Email Routing
Email Routing is a cPanel feature that allows you to manage how and where emails are sent to your domains. 1. Logged into your cPanel, select "Email Routing" in the Email section. You can route the emails that will come to your inbox to another server, for example. First, select the domain you will change the configuration to. You can use the "Automatically detect configuration" option so it will be configured according to the configuration shown in the image below. Note: if the MX input is not functional, this configuration will not be effective 2. You can select from 3 other options on how emails should behave. - Local email exchanger: The server will always accept emails for this domain. The system will deliver emails to the local mailbox. * Mail Exchanger Backup: The server will act as a backup, receiving messages until a lower priority MX becomes available; * Remote Mail Exchanger: the server will not accept emails for this domain, sending all messages to the mail exchanger with the lowest number. -After selecting the desired option, simply click on change, the selected option will always appear in bold.
Customize error pages
First you must access your cPanel: See how to obtain credentials and access cPanel through our article: Here 1. Logged into your cPanel, locate the “Advanced” section and there locate the item “Error pages”; In step 1 you must select the domain you want to manage; In step 2 you select “Edit common error codes” and select the error page you want to customize; You will be redirected to an edit page; After editing or modifying click on “Save” located below and a success message will be displayed. - After editing or modifying click on “Save” located below and a success message will be displayed.
Select PHP Version
To change PHP version you must first access your cPanel. Note: After changing the PHP version, the selected version will be used in all hosting and may affect projects already published. 1 - In the “Software” section, select the “Select PHP version” option; 2- Select the desired version, click on “Apply” and then click on “Save”; There, your version has been successfully updated! In “Extensions" you will find the list of available extensions. Make the desired changes, just selecting the desired options. After selecting, the desired options will be automatically saved.
Default Address
It is a feature that allows you to collect all emails sent to an invalid email address on the domain Step 1 1 - Logged into your cPanel, select "Default Address" in the Email section. 2 - Arriving on this screen you must choose the domain that will carry out the configuration. Now, you must decide what the system will do with messages for non-existent senders from that domain. 1. "Discard the email while the server processes it at SMTP time with an error message", an error message is sent to the sender; 2. "Forward to email address", the message can be directed to an email account of your choice; Step 2 1. It is still possible, in "Advanced Options", to choose three other alternatives: 4. Finally, save your settings by clicking "Change". Hope this helps !
Configure Greylisting
Greylisting protects email users from spam. When you enable greylisting, the email server temporarily rejects any email from a sender that the server does not recognize. If the email is legitimate, the server that sent it will try to send the email again after some time. After a sufficient period of time, the server will accept the email. Step 1 Logged into your cPanel in the “EMAIL” tab, locate the “Configure Greylisting” item. Step 2 Locate the domain in the list or type the domain name in the “Search” text box. Clique em "ativado/desativado*"* no canto direito para ativar ou desativar a Greylisting. Hope this helps !
Creating a MySQL Database
The MySQL database allows you to store a lot of information with ease of access. Before using the database, first you must create one. Also, you need to create at least one MySQL user to access the database. Step 1 At your cPanel, in the "Databases" section, click on "Manage My Databases". Step 2 Here, you must type the database name, then click at "Next Step". Step 3 NOTE: If everything worked so far, you will see a success message in the upper corner of your screen. Now, you need to create a database user. Fill in the username and password (it needs to meet the security requirements), you may also use the "Password Generator" if you want to. Then, click on "Create User". Step 4 Now, you need to assign access privileges to your newly created user, or grant him all privileges by clicking on "ALL PRIVILEGES". When you are done, click on "Make Changes". A success message should be displayed.
Virus Scanner
The virus scanner is used to check for possible threats on your hosting. Step 1 Logged into your cPanel, go to the “Advanced” section and locate the “Virus Scanner” item. Step 2 On this screen below you will choose which part of the hosting you want to check, it is worth remembering that you can only check one part at a time, if you want to check the entire hosting just select the option “Check entire home directory”. Step 3 After checking, a message informing you whether or not the virus should be displayed on your screen. Además de otra información, la cantidad de archivos presentes y la cantidad de archivos que ya han sido escaneados y el porcentaje de verificación. Si se indicó un archivo en el análisis, deberá elegir la acción deseada al final del procedimiento. - Disinfect (try to clean the file) - Quarantine (keeps the file isolated for later verification); - Destroy (removes the file - highly recommended option); - Ignore (do nothing - not recommended). Note: In some situations, while the cPanel scanner is running, web access to domains present in the account may be blocked.
Track DNS
Network tools allow the user to find information about any domain or trace the path from the server on which the website resides to the computer from which they access cPanel. Step 1 Entered into your cPanel, in the “ADVANCED” tab, locate the “DNS Tracking” item. Step 2 Enter the domain you want to search in the search bar and click search. And various information such as DNS will be displayed. Step 3 And it also has the path tracing feature, the feature allows you to trace the path from the computer from which you are accessing cPanel to the server where the website is located. Simply click "Tracking" and the information will be displayed.
Remote Dtabese Access
Add a specific domain name or IP to allow visitors to connect to MySQL databases. Step 1 Logged into your cPanel in the “Database” section, locate the “Remote MySQL” item. Step 2 Now enter the hostname (domain, server or IP address). The wildcard character “%” is allowed, when using it you allow access to all IPs that begin with 170.245.65 by replacing the final numbers with “%”. Then just click on “Add host” and a success message should be displayed on your screen. Step 3 If you want to remove access to your bank, simply click “delete” on the item you want to remove. Step 4 You will be directed to this screen, and just click on “remove access host” and wait for a success message to be displayed on your screen. Hope this helps !
Forwarders
Step 1 Logged into your cPanel in the “EMAIL” tab, locate the “Forwarders” item. Step 2 Nesta tela na opção de “Gerenciamento” você pode escolher se deseja criar encaminhador para apenas um domínio ou para todos os domínios da sua conta. No campo “Endereço de encaminhamento” informe a conta de e-mail que deseja configurar para o redirecionamento. No campo “Encaminhar para o endereço de e-mail” informe o endereço de e-mail que receberá a cópia do e-mail. Step 3 In addition to forwarding individual email accounts, you can forward all emails from one domain to another. To send all email from a domain to a single email address, change the default address for that domain. On this next screen, simply fill in which domain you want to forward to and click on “Add domain forwarder”. Hope this helps!
TXT record
How to create a TXT record Step 1 Logged into your cPanel in the "DOMAINS" tab, locate the "Zone Editor" item. Step 2 On this screen you select the domain you want to edit and click Manage. Step 3 Now click on "Add record" enter the name and in the TYPE tab select "TXT", in the TLL option you can leave the default values, in "Registration" enter your TXT key. And finally just click "Save record".
MIME Types
MIME types tell browsers how to identify specific extensions. For example, the text/html MIME type is the same as the .htm, .html, and .shtml extensions on most servers, and it asks the browser to interpret all files with these extensions as HTML files. MIME types are often used to identify new technologies as they appear. When WAP technology appeared, no one had these extensions configured on the server. However, with MIME types, you could have configured it yourself and started displaying WAP pages immediately. Step 1 Logged into your cPanel in the “ADVANCED” tab, locate the item “MIME Types”. Step 2 Now you must go to create a MIME type, now enter the mime type you want to create and in "Extensions" enter the extension(s) that it will interpret. Step 3 When finished, your MIME type will appear under “User-defined MIME types”. Below, all MIME types already defined by the system are listed. Note These MIME Types cannot be changed or removed.
Track Delivery
Review the delivery route of an email. This can be useful if you need to locate issues with email delivery and other options such as the sender, sending time, spam score, recipient, result, and actions taken by the server. Step 1 Logged into your cPanel in the "EMAIL" tab, locate the item "Track delivery". Step 2 By default, the 250 most recent failed message deliveries sent to your email accounts will be shown. On this screen under "Recipient's email" you can enter a specific email address for the search to be carried out. If you don't want to, just click "Run report". You can also choose between the first two options: 'Show all' or 'Show blocked and failed' as shown above. And you can also choose to display only one of the four options at a time, as shown below. And also in the “Delivery reports” section in the right corner, as shown by the arrow, you can select more data options to be displayed in your query.
Email Filters
Create and manage email filters for the specified email address. This can be useful if you want to prevent spam, redirect emails, or redirect messages to a program. Step 1 Log in to your cPanel in the "EMAIL" tab, locate the "Email Filters" item. Step 2 On this screen, click “manage filters” next to the email you want to create or manage a filter for. Step 3 Then click "create a new filter". Now choose a name of your choice for the filter. Step 4 In this part you must define a rule for this filter, be careful when choosing so as not to end up blocked more than desired. And finally choose what function this filter will have by clicking on “Actions”. You can also create more than one rule or action in the same filter simply by clicking on the “+ or -” symbol located at the end of the right corner of each option.
Spam Filters
Identify unsolicited bulk emails, more commonly known as spam, and send them to a separate folder (Spam Box) or automatically delete them from your email account. Step 1 Logged into your cPanel in the “EMAIL” tab, locate the item “Spam Filters” Step 2 On this screen, in the option “Process new emails and mark them as spam” activate this option so that the server analyzes suspicious messages and marks them as spam. The server scores messages as a filter to determine whether or not they are spam. Step 3 The server's pre-defined threshold score is 5, but you can change it by clicking on “ Spam Threshold Score “, and set the score that best fits your needs. The score is analyzed in descending order where the lower the score value, the more strict the system will be with that email.. Step 4 You can also check the option “automatically delete new spam”, as the name says, it will delete any message that is defined as spam, so be very careful when activating this option. When activated a success message should be displayed in the top right corner of your screen.
PostegreSQL Databases
To use a database, you will need to create it. Only PostgreSQL users with privileges to access a database can read or write to that database. How to create and add a user to the PostgreSQL database Step 1 Logged into your cPanel in the “DATABASE” tab, locate the item “PostgreSQL Database”. Step 2 In the “Create a new database” option you must define a name for your database, then click to create and a success message should be displayed on your screen. The created database should be listed below under “Current databases”. Step 3 Now we will create a user for this database, fill in the fields with the necessary data and click on "Create user". Current users are listed at the bottom of the page. Step 4 Now let's add this user to the database we created. You must select the user you want, and also choose which bank to add if you have more than one. Finally click “Send” and the success message should be displayed on your screen. Hope this helps !
MySQL Database
MySQL databases are required to run many web-based applications, such as information dashboards, content management systems, and online shopping carts. Step 1 Logged into your cPanel, in the DATABASE tab, locate the item “Manage My Database” note: The item is also called "MySQL Databases" in older versions of cPanel Step 2 Now let's create a bank. Just choose a name for this database and then click on “Create database”. A success message should be displayed. Step 3 Now you must create a user to be able to use this database. Scrolling down the tab you will find the option to create a user as in the image, fill in all the spaces with the necessary information. After clicking create the success message should be displayed again. Step 4 Now we have to link the user to the bank. To do this, go to the bottom of the page and find the option “Add user to database”. Select the user and bank you want to link, be careful when choosing if you have more than one user or bank. When you click add you will be redirected to the screen below, where you will choose the user's privileges. You can change privileges in the future, just go to your databases and click on the name of the user you want to change the permission.
How to import/export a MySQL database
1 - In cPanel, go to “PhPMyAdmin”; Import: 2 - Click on "Import"; 3 - Click the "Choose File or File" button and select your database (.sql); 4 - Click the "Execute" button; Export: 2 -Choose the database you want to export from the list on the left; 3 - Click the "Export" button and choose one of the options: Fast: export the entire database using the predetermined options Custom: allows you to choose which tables to export, also allows you to change the export options. Below you see images if you select the custom option where you define everything you want manually 4 - After defining everything you want in your export, click the "Execute" button and the download will begin.
Snapshots
Snapshots is a full backup, meaning that it can be started at a specific time. Some snapshots do not use the disk space of your cPanel account, because it is stored in the destination of backup storage of your hosting provider. It is highly recommended to start a snapshot of your account before making any important updates to your site. If your updates/alterations are false, you can restore your site using a recently created snapshot of your account. Once you are logged in to cPanel, just follow the steps: 1. In the initial screen of cPanel, go to the Jetbackup section and click on the "Snapshots" icon. 2. On this page, you can create Snapshots and view all the Snapshots available on your account.
How to import/export a PostgreSQL database
Important: First you need to create a PostgreSQL database following this tutorial: https://help.scriptcase.net/portal/pt/kb/articles/banco-de-dados-postgresql 1 - In cPanel, access “phpPgAdmin”; To import: 2 - In the left panel of the screen, click on PostgreSQL and then on the name of the destination database for the imported data; 3 - When clicking on the desired bank, click on the "SQL" button; 4 - Click the "Choose file" button, select the ".sql" file from your device and then click the "Run" button; To export: 1 - Expand (click on the +) the PostgreSQL option in the list on the left; 2 - Choose the database you want to export. 3 - Click on the "Export" option; 4 - Select the "Structure and data" option; 5 - Change the format to "SQL"; 6 - Select the "Download" option and click "Export". The system will ask you where you want to save the bank on your device.
JetBackup Settings
On this page, you can enter your e-mail and we will send a notification when the action you selected is complete.
How to add a domain redirect
Step 1 - Login to cPanel Log in to your dashboard cPanel and go to the Domains section, and look for the Redirects item. Step 2- Add redirect 1- On this screen choose between a redirection type Permanent (301) Temporary (302) 2- In “https?://(www.)?” select the domain that will be redirected 3- If you want to redirect to a specific directory, use the “/” field to set that directory. 4- In “Redirects to” enter the destination domain. 5 - In “www redirect:” it is recommended to always use the Redirect with or without www option 6 - Observation: Checking the Wildcard Redirection box will redirect all files within a directory to the same filename in the redirected directory. You cannot use a wildcard redirect to redirect the main domain to a different directory on your site. 7 - Finally, just click “Add”.
Leech Protection
Here's how to use cPanel's Leech Protect feature to prevent users from disclosing or publishing their passwords in a restricted area of your website. This feature will redirect accounts that have been compromised with a chosen URL (and suspend them if you choose to do so). When users publish using their name and password, unauthorized and malicious visitors can use the credentials to access restricted areas on the website. This practice is known as Leeching. Here's how to activate Leech Protection in the directory: 1. Log in to your cPanel account.In the "Security" section, click on the "Leech Protection" icon. 2. Click the name of the directory you want to protect. Click in “Edit”. On the screen below you will see options to configure your Leech Protection. 1. Under “Configure Leech Protection”, enter the number of logins allowed per username in a two-hour period. 2. Enter a URL to redirect users to another page if their account is compromised. 3. To receive an email alert if your account is compromised, select the “Send email alert to” option and enter an email address." 4. To disable compromised accounts, select the “Disable compromised accounts” option. 5. To finish, click “Enable”. A success message will be displayed Hope this helps !
Jetbackup 5 - Overview
Jetbackup is a plugin for cPanel that has the functionality to help restore and obtain backups of your cPanel account, allowing you to download or restore files, databases and emails. When accessing cPanel, we must navigate to the item JetBackup 5 By accessing this item, we can view the JetBackup 5 homepage Jetbackup 5 has a new interface, with better usability and new options, making it easier to search for specific items. Among them, we can highlight the items below divided into two categories: Restore & Downloads and View & Manage. Restore & Downloads In these sections you can view, restore or download backups. Full Backups - This option displays a list of all backups in your cPanel account in full. See more details by accessing Jetbackup 5 - Full Backups : How to restore your cpanel account Home Directory - Displays the list of backups for the files present in the home folder of your cPanel account. See more details by visiting JetBackup 5 - Home Directory : How to restore files and folders Cron Jobs - In this option are listed the backups referring to the Cron, created through cPanel, by the item Cron Jobs. More information go to JetBackup 5 - Cron Jobs : How to restore Cron Jobs Databases - When accessing this item, it is possible to visualize and choose the date and database. See the necessary steps through our article JetBackup 5 - Databases : How to restore a database Database Users - We can view all the database users that have been created. See more details in our article JetBackup 5 - Database Users : How to restore a database user DNS Zones - This option displays the DNS records that have been added to your cPanel account. Go to JetBackup 5 - DNS Zones : How to Restore a DNS Zone for more information. Certificates - This option displays the SSL certificates registered in your cPanel account. Email Accounts - In this item we can get backups of email accounts created in cPanel. See our article JetBackup 5 - Email Accounts : How to restore an email account FTP Accounts - In FTP Accounts we can get the backup of FTP accounts created in cPanel. See JetBackup 5 - FTP Accounts : How to Restore an FTP Account for more details. View & Manage In this section we can customize and view Jetbackup 5 information associated with cPanel account Manage Account - In this item we can register an email to receive notifications. See more details in JetBackup 5 - Manage Account : How to add an email to receive notifications View Downloads - In this option we can view all completed downloads. Go to JetBackup 5 - View Downloads : How to View Download History for more information. Queue - This item displays all requests for restore, download and backups in progress. See JetBackup 5 - Queue for more details
Jetbackup 5 - Full Backups : How to restore your cpanel account
Jetbackup 5 has a new interface, with better usability and new options, making it easier to search for specific items. In this article we will see how to restore a cPanel account and all its items such as database, files, email accounts, ftp accounts, etc... First we must access cPanel and navigate to the JetBackup 5 item. After loading the JetBackup 5 splash screen, we must access the Full Backups option In this step, we will select the backup referring to the desired date. We can carry out the restoration or request the generation of the backup for download through the Download button. For this article, we will proceed with the restoration by clicking the Restore button After clicking on the Restore button, a new screen will be displayed, we just have to click on the Restore Selected Items button to start the restoration. At this point, we just have to wait for the restoration to complete. It can be followed through the Queue option. Related articles Jetbackup 5 - Overview JetBackup 5 - Queue
JetBackup 5 - Home Directory : How to restore file and folders
Jetbackup 5 has a new interface, with better usability and new options, making it easier to search for specific items. In this article we will see how to restore files and folders from a cPanel account. First we must access cPanel and navigate to the JetBackup 5 item. After the JetBackup 5 splash screen has loaded, we must access the Home Directory option In this step, we must select the desired backup according to the date. A new button will appear, called Change Files Selection, with this option we can choose which files and folders will be restored or selected for download. If you want to restore or download all files and folders, just skip this step. For this article we will select some files and folders through the Change Files Selection button On this screen, we can select the desired files and folders. We can also navigate inside a folder by clicking on its name. After selecting all the desired items, we can proceed by clicking the Select Files button We now have two items selected, a file and a folder. As we can see next to the backup date. At this point, we can proceed with restoring the files through the Restore button or request the files to be downloaded through the Download button. For this article, we will use the Restore button. By clicking on the Restore button, we can see the following screen, and proceed with the restoration by clicking on the Restore Selected Items button At this point, we just have to wait for the restoration to complete. It can be followed through the Queue option. Related articles Jetbackup 5 - Overview JetBackup 5 - Queue
JetBackup 5 - Cron Jobs : How to restore Cron Jobs
Jetbackup 5 has a new interface, with better usability and new options, making it easier to search for specific items. In this article we will see how to restore cron jobs from a cPanel account. First we must access cPanel and navigate to the JetBackup 5 item. On the JetBackup 5 home screen we must access the Cron Jobs option In this step we must select the backup according to the desired date. And then click the Restore button to restore the Cron Job or the Download button to request the download of the Cron Jobs. For article, we will proceed with the Restore option By clicking on the Restore button, a new screen will appear with the restoration information, we can proceed with the restoration by clicking on the Restore Selected Items button. At this point, we just have to wait for the restoration to complete. It can be followed through the Queue option. Related articles Jetbackup 5 - Overview JetBackup 5 - Queue First steps with the Hosting: access Cron Jobs
JetBackup 5 - Databases : How to restore a database
Jetbackup 5 has a new interface, with better usability and new options, making it easier to search for specific items. In this article we will see how to restore a database from a cPanel account. First we must access cPanel and navigate to the JetBackup 5 item. On JetBackup 5 initial screen, select the Databases option In this step, we must select the desired database to perform the Download or Restore. To select a specific date, click on the Choose Other Backup button and choose the desired date. And then we can click the Restore button to restore the backup or the Download button to start generating the file for download. For this article, we will use the Restore option. After clicking the Restore button, we can view the information about the requested backup. And by clicking on the Restore Selected Items button, the restore process will start. At this point, we just have to wait for the restoration to complete. It can be followed through the Queue option. Related articles Jetbackup 5 - Overview JetBackup 5 - Queue JetBackup 5 - Database Users : How to restore a database user
JetBackup 5 - Database Users : How to restore a database user
Jetbackup 5 has a new interface, with better usability and new options, making it easier to search for specific items. In this article we will see how to restore a database user from a cPanel account. First we must access cPanel and navigate to the JetBackup 5 item. On JetBackup 5's initial screen we must select the Database Users option In this step, we must select the desired database user to perform the Download or Restore. To select a specific date, click on the Choose Other Backup button and choose the desired date. And then we can click the Restore button to restore the backup or the Download button to start generating the file for download. For this article, we will use the Restore option. After clicking the Restore button, we can view the information about the requested backup. And by clicking on the Restore Selected Items button, the restore process will start. At this point, we just have to wait for the restoration to complete. It can be followed through the Queue option. Related articles Jetbackup 5 - Overview JetBackup 5 - Queue JetBackup 5 - Databases : How to restore a database
JetBackup 5 - DNS Zones : How to restore a DNS zone
Jetbackup 5 has a new interface, with better usability and new options, making it easier to search for specific items. In this article we will see how to restore a DNS Zone from a cPanel account. First we must access cPanel and navigate to the JetBackup 5 item. On the JetBackup 5 initial screen we must select the DNS Zones option In this step, we must select the desired domain to perform the Download or Restore. To select a specific date, click on the Choose Other Backup button and choose the desired date. And then we can click the Restore button to restore the backup or the Download button to start generating the file for download. For this article, we will use the Restore option. After clicking the Restore button, we can view the information about the requested backup. And by clicking on the Restore Selected Items button, the restore process will start. At this point, we just have to wait for the restoration to complete. It can be followed through the Queue option. Related articles Jetbackup 5 - Overview JetBackup 5 - Queue
Hotlink Protection
What is it Hotlink Protection? Hotlink Protection prevents other websites from using files, photos from your website. It will be possible to link files that you do not specify. Ex: Let's say you use an image on your website, and someone else wants to use the same image. If someone uses your image's URL on their website, every time the image is accessed, the image is downloaded from your website. As a result, bandwidth is being used with each access to the image. When enabling Hotlink, it will no longer be possible to carry out this process. Here's how to activate Hotlink protection: 1. Once you are logged into cPanel, simply click on Hotlink Protection; Check the domain you want to protect in “URLs to allow access”; In “Block direct access to the following extensions (separated by comma)”, enter the extensions you want to block. Click “Allow direct requests”. Now just click “Send”. That's it, hotlink protection is enabled on your website.
JetBackup 5 - Email Accounts : How to restore an email account
Jetbackup 5 has a new interface, with better usability and new options, making it easier to search for specific items. In this article we will see how to restore an email account to a cPanel account. First we must access cPanel and navigate to the JetBackup 5 item. On the JetBackup 5 initial screen we must select the Email Accounts option In this step, we must select the desired email account to perform the Download or Restore. To select a specific date, click on the Choose Other Backup button and choose the desired date. And then we can click the Restore button to restore the backup or the Download button to start generating the file for download. For this article, we will use the Restore option. After clicking the Restore button, we can view the information about the requested backup. And by clicking on the Restore Selected Items button, the restore process will start. At this point, we just have to wait for the restoration to complete. It can be followed through the Queue option. Related articles Jetbackup 5 -Overview JetBackup 5 - Queue
JetBackup 5 - Manage Account : How to add an email to receive notifications
Jetbackup 5 has a new interface, with better usability and new options, making it easier to search for specific items. In this article we will see how to add an email to receive notifications in a cPanel account. First we must access cPanel and navigate to the JetBackup 5 item. On the JetBackup 5 initial screen we must select the Manage Account option In this step we must inform a valid e-mail and save the changes through the Save button If you do not wish to receive notifications, just leave the item blank. Related articles Jetbackup 5 -Overview
JetBackup 5 - View Downloads : How to view download history
Jetbackup 5 has a new interface, with better usability and new options, making it easier to search for specific items. In this article we will demonstrate how to view the download history in a cPanel account. First we must access cPanel and navigate to the JetBackup 5 item. On JetBackup 5's initial screen we must select the View Downloads option On the next screen we can view the requested downloads To proceed with the download we must click on the Download button**** Related articles **Jetbackup 5 -**Overview
JetBackup 5 - FTP Accounts : How to restore an FTP account
Jetbackup 5 has a new interface, with better usability and new options, making it easier to search for specific items. In this article we will see how to restore an FTP account to a cPanel account. First we must access cPanel and navigate to the JetBackup 5 item. On the JetBackup 5 initial screen we must select the FTP Accounts option In this step, we must select the desired FTP account to perform the Download or Restore. To select a specific date, click on the Choose Other Backup button and choose the desired date. And then we can click the Restore button to restore the backup or the Download button to start generating the file for download. For this article, we will use the Restore option. After clicking the Restore button, we can view the information about the requested backup. And by clicking on the Restore Selected Items button, the restore process will start. At this point, we just have to wait for the restoration to complete. It can be followed through the Queue option. Related articles Jetbackup 5 - Overview JetBackup 5 - Queue
JetBackup 5 - Queue
Jetbackup 5 has a new interface, with better usability and new options, making it easier to search for specific items. In this article we will demonstrate how to view the Queue item in a cPanel account. First we must access cPanel and navigate to the JetBackup 5 item. On the JetBackup 5 initial screen we must select the Queue option On the next screen, we will be able to view the entire history of processes carried out in JetBackup 5, such as requests for Restore, Download and finished items. Related articles Jetbackup 5 -Overview
Manage API Tokens
API functions allow you to view and change account data without having to log in to the cPanel interface. (You can issue API tokens to allow others to perform API functions with your account data) Example: You could issue an API token to a reseller. The reseller could use this token to check disk usage. How to create an API Token in Cpanel 1- When accessing your cPanel, go to the Security tab and locate the item "Manage API Tokens" 2- In the "Token name" field, define a name to recognize your Token. Then set the period when your token expires or you can create a token that will not expire. After defining this period, simply click Create. **3-**Now copy the API Token and save it somewhere safe, this will be your only chance to copy and save this code. Finally click Yes, I saved my Token. **4-**Now you have created your API Token, it should be listed with the name you defined for it in the home tab of the "Manage API Tokens" item
Raw Access
The Raw Access feature allows you to view the access history of your domains and websites. The data is presented pure, through a text file. They offer information about visitors, as well as which page of the website was accessed. This can be quite useful when you want to quickly see who has visited your website. 1- In your cPanel, in the metrics section, go to the "Raw Access" section 2- Now you must choose between the two options, which are configurable, you can select only the one you want. Once configured, just click the "save" button 3- In this step, the hosting domains and subdomains and the last update of the log file and the disk usage of this file will be listed. 4- In its last step, the previous log files were listed. Here you choose which file you want to download. After downloading you must extract the file.
MultiHP Manager
How to set the PHP version per domain! The MultiPHP Manager allows you to define separately per domain the version of PHP you will use. 1- Go to your hosting's cPanel in the "Software" section and look for the item "Multi PHP Manager" as in the image: **2-**This screen will list all your domains. Select the domain you want to change in the checkbox, so that you don't change the PHP version of a domain you don't want. Note: Only "ea-" versions of PHP are supported After setting the version, a success message should be displayed. Note: Now that the PHP version has been defined, if you need to make adjustments to the PHP directives, simply use the "MultiPHP INI Editor" item in your cPanel
Analog Statistics
Analog produces a simple summary of everyone who has visited the site. It features great lightweight and detailed statistics. Analog shows people who accessed the site during a specific month. 1- Accessing your cPanel, go to the "Metrics" section and click on the "Analog Statistics" item 2- In this part, the domains and subdomains present in your account are listed. You must click on the "View" option on the domain you want to analyze. 3- After that, it will display a list with some dates, listing the last 12 months, you choose the date you want to analyze. 4- The general summary is the first option to be shown, but just scroll down and other options will be displayed, such as: general summary, monthly report, daily summary, hourly summary, domain report, etc.
How to create email accounts
To create email accounts you need to have access to cPanel. Step 1 The first step will be to log in to your cPanel panel. Within your cPanel you must locate the Email section and then go to the "Email Accounts" item. Step 2 On this screen, you must go to the option in the right corner under "Create" Step 3 You are now on the account creation screen, just fill in the spaces with what is requested, creating a prefix according to the domain of your hosting account. We recommend at least one capital letter when defining the password to ensure considerable difficulty. While setting the password, a difficulty counter is shown at the bottom. Lastly, just click on Create ! A creation success message should be displayed . Hope this helps !
Optimize website
How to optimize your website? Step 1 To optimize your website, you first need to access your cPanel dashboard. After logging into cPanel, look for the 'Software' section there you can find the 'Optimize website' item, see: Step 2 On this next screen you will have some options to optimize your website. Here are all the options for file compression: 1. Disabled: No files will be compressed with this option. 2. Compress all content: All content will be compressed when you choose this option. 3. Compress specified MiME types: Choose which content types to compress. You now have the options to compress your website content automatically through Apache. By default this feature is always disabled. We recommend using the “Compress all content” option. If you only want to compress some specific files, select the “Compress specified MIME types” option and enter the files you want to compress in the field below. Whenever you make a change, click the "Update Settings" button. Step 3This is the last step. After clicking "Update settings" a success message should be displayed on your screen.
Autoresponders
With this item it is possible to configure automatic responses for all emails received, ideal for confirming receipt, informing travel periods, for example. Firstly, let's access your cPanel panel. Step 1 After accessing cPanel, go to the Email section, there look for the item 'Automatic responders' Step 2 On this screen you can create a new respondent by clicking on 'Add automatic respondent' or add an existing respondent where the 'Current respondents' option is displayed. Step 3 To add a new respondent, you must now configure the settings for sending the automatic response: Character set: UTF-8 is defined by default Range: According to your needs. E-mail: The e-mail that will be registered for the automatic response. Domain: The domain from which you will create the responder. From: Name of person responsible for the email. Step 4 Now define when it starts: Start: With options to activate immediately or customize a start date. Stop: With options to deactivate immediately or customize a deactivation date.
E-mail deliverability
Use este item para identificar problemas com seus registros DNS relacionados a e-mail de seus domínios. O sistema usa esses registros para verificar se outros servidores podem confiar nele como remetente. Passo 1- Para usar esta interface você precisa primeiro acessar o seu cPanel. Após seu acesso ao cPanel, navegue até a seção 'Email" e localize o item **'E-mail Deliverability'. ****Passo 2-**Nesta tela será exibido seus domínios caos tenha mais de um. Selecione o domínio que deseja realizar os reparos. Clicando na opção de “Gerenciar", você pode configurar manualmente os registros DNS relacionados a correio de um domínio. Em seguida você poderá visualizar todos os campos que estão com problemas existentes. Na tela lateral você pode tirar mais dúvidas O que é DKIM ou SPF, por exemplo. Ele te levará a um artigo detalhado explicando sobre cada opção. A opção 'Reparar'. O próprio sistema realiza a configuração do DKIM & SPF de forma correta para que seus e-mails sejam entregue. Você pode copiar ou personalizar uma configuração sugerida antes de aprovar os reparos do sistema. Após verificar, basta clicar na opção 'Restaurar' e aguardar que o processo seja concluído. Sua chave DKIM privada é um risco de segurança. Se outras pessoas obtiverem sua chave DKIM privada, poderão assinar e-mails e se passar por você como remetente. Certifique-se de fornecer sua chave DKIM privada apenas a um usuário confiável.
How to prevent your server's IP from ending up on a blacklist
To prevent your server's IP from being blacklisted, consider implementing the following best practices: 1. Keep Everything Updated: Ensure your software, and applications, is always up to date with the latest security patches. 2. Monitor for Suspicious Activities: Use monitoring tools to identify suspicious activities or malicious traffic, and respond promptly to such incidents. 3. Avoid Suspicious Behavior: Steer clear of behaviors that might be interpreted as malicious, such as sending large volumes of emails in short periods or making numerous requests to a server in a short timeframe. **4.**Monitor IP Reputation: Use IP reputation monitoring services to identify if your IP is on any blacklists. **5.**Incident Response: If your IP is already blacklisted, take immediate corrective actions and follow the recommended procedures from the listing authorities. 6. Avoid IP Sharing: If possible, avoid sharing your IP with other services, especially if you cannot ensure their proper behavior. **7.**Avoid sending large volumes of emails: Avoid sending large volumes of emails to recipients who haven't opted to receive your messages. Additionally, refrain from including malicious or prejudiced content, as this may lead recipients to report your emails as spam. Remember, prevention is crucial, but being prepared to respond quickly if your IP is listed is equally important.
How to create a subdomain in cPanel
Creating a subdomain in cPanel is a simple and straightforward process. Here are the detailed steps to create a subdomain using cPanel: 1. Access cPanel**:** - Log in to your cPanel account. Usually, the URL to access cPanel is https://yourdomain.com/cpanel. 2. Locate the Domains Section**:** - On the cPanel home screen, look for the section called "Domains". - Create the Subdomain**:** - You will see a form to create a new subdomain. - Click the "Create a New Domain" button to add the subdomain. cPanel will configure the subdomain and create the corresponding directory on the server. - Subdomain: Enter the name of the subdomain you want to create. For example, if you want to create blog.yourdomain.com. - Domain: If you have multiple domains in your account, select the main domain to which the subdomain will be added. - Document Root: This field is automatically filled with a suggested path, such as /public_html/blog. You can leave this path or change it as needed. 3. Configure the Subdomain**:** - After creating the subdomain, you may need to add files to the subdomain's directory (/public_html/blog) so that the content is displayed when someone accesses the subdomain. - If necessary, configure any additional DNS settings or adjust the subdomain's settings as specified by your hosting provider. Note: Typically, subdomains are active within a few minutes, but it can take up to 24-48 hours for them to fully propagate. That's it! Now you have a subdomain configured in your cPanel. If you need additional features, such as SSL certificates for the subdomain, you can configure these in the "SSL/TLS" section of cPanel.
How to associate the user with the PostgreSQL Database
To associate a user with a PostgreSQL database in cPanel, follow the detailed steps below: 1. Access cPanel: Log in to your cPanel account. 2. Go to the Databases section: On the cPanel home page, locate the "Databases" section. Click on "PostgreSQL Databases". 3. Create a Database (if necessary): If you don't have a database yet, create a new one. In the "Create New Database" section, enter the database name and click "Create Database". Look: Here 4. Create a PostgreSQL User (if necessary): Scroll down to the "Add New User" section. Enter the desired username and password. Click "Create User". Look: Here 5. Associate User with the Database: In the "Add User to Database" section: - Select the user you created from the "User" menu. - Select the database you want to associate the user with from the "Database" menu. - Click "Submit". Important Note: Name and Password: Use a strong and secure password for the database user. By following these steps, you will be able to associate a user with a PostgreSQL database in cPanel. If you encounter any specific difficulties, the hosting support team can provide assistance.
How to create a PostgreSQL database
Here is a step-by-step guide to creating a PostgreSQL database on your hosting. 1. Login to cPanel: Access cPanel using your user credentials and password provided by your hosting provider. 2. Locate the “Databases” section: In the main cPanel dashboard, scroll down until you find the “PostgreSQL Databases” section and item. 3. Create a new database: In the PostgreSQL Databases section, you should see the option “Create a database”. 3.1 – Enter a name for the database: Choose a meaningful name for your PostgreSQL database, after choosing just click on the “Create Database” option 4. After creation, a message should appear stating that the creation was successful and your database will appear on the item's home screen. By following these steps, you will be able to create a PostgreSQL database in cPanel. If you encounter any specific difficulties, the hosting's technical support will be able to provide assistance.
How to Synchronize User Privileges - PostgreSQL
To synchronize user privileges - PostgreSQL in cPanel, you can follow these steps: 1. Access cPanel: 1. Log in to your cPanel account. 2. Navigate to the Databases section: 1. Find and click on the "PostgreSQL Databases" section. 3. Create or select a database: 1. If you don't already have a PostgreSQL database created, create a new one. Look: Here Otherwise, select the existing database for which you want to synchronize user privileges. 4. Manage users: 1. In the "PostgreSQL Databases" section, you will see an area where you can add new users or manage existing users. 2. To add a new user, enter the username and password, then click "Create User". To create a new user, see: Here 3. To manage an existing user, select the user from the list. 5. Add user to the database: 1. After creating or selecting a user, you will see the option to add the user to a database. 2. Select the database to which you want to grant privileges to the user. 3. Then click "Submit". 6. Synchronize privileges: 1. Lastly, in the "Current Users" option, click "Synchronize Grants". By following these steps, you should be able to effectively synchronize PostgreSQL user privileges in cPanel.
How to create a PostgreSQL database
Here is a step-by-step guide to creating a PostgreSQL database on your hosting. 1. Login to cPanel: Access cPanel using your user credentials and password provided by your hosting provider. 2. Locate the “Databases” section: In the main cPanel dashboard, scroll down until you find the “PostgreSQL Databases” section and item. 3. Create a new database: In the PostgreSQL Databases section, you should see the option “Create a database”. 3.1 – Enter a name for the database:Choose a meaningful name for your PostgreSQL database, after choosing just click on the“Create Database” option **4.**After creation, a message should appear stating that the creation was successful and your database will appear on the item's home screen. By following these steps, you will be able to create a PostgreSQL database in cPanel. If you encounter any specific difficulties, the hosting's technical support will be able to provide assistance.
How to create a user for PostgreSQL database
Here is a step-by-step guide to creating a user for your PostgreSQL database 1. Login to cPanel: Access cPanel using your user credentials and password provided by your hosting provider. 2. Locate the “Databases” section: In the main cPanel dashboard, scroll down until you find the “PostgreSQL Databases” section and item. **3.**Create a user for the database: After creating the database, you will need to associate a user with it. On the same database creation page, you should find a section to create a new user. Enter a username and secure password. 4**.** After filling in all the blank spaces, you must click on the "create" option After this, a message showing that the creation was successful should be displayed. By following these steps, you will be able to create a PostgreSQL database user in cPanel. If you encounter any specific difficulties, the hosting's technical support can provide assistance.
File Transfer via FTP
1. Obtain FTP Access Credentials - Host: usually the address of your server or something like ftp.yoursite.com. - User: provided by your hosting provider. - Password: set by you or provided by the provider. - Port: usually port 21 for FTP. 2. Choose an FTP Client There are several FTP clients you can use. Some of the most popular ones are: - FileZilla (available for Windows, macOS, and Linux) - Cyberduck (available for macOS and Windows) - WinSCP (available for Windows) 3. Connect to the FTP Server 1. Open the FTP client (we'll use FileZilla as an example). 2. Enter the access credentials: - Host: type the address of your FTP server. - Username: enter your FTP username. - Password: enter your FTP password. - Port: type 21 if not specified automatically. 3. Click "Quickconnect" (or similar). 4. Navigate to the Destination Folder - In the FTP client's interface, you will see two main windows. The left window shows your local files (on your computer) and the right window shows the files on the server. - Navigate to the destination folder on the server (usually public_html or www for websites). 5. Upload the Files - Select the local files you want to upload. - Drag and drop these files into the server window in the destination folder. - The FTP client will start uploading the files. Depending on the file size and your connection speed, this may take some time. 6. Verification - Once the upload is complete, verify that the files were uploaded correctly by accessing your site or folder in the browser. Additional Tips - Organization: keep your files organized in folders for easier navigation and maintenance. - File Permissions: in some cases, you may need to adjust file and folder permissions on the server (this can be done in the FTP client). - Backup: always keep a backup of your local files before making major changes.
How to Fix Permissions on Your Hosting
1. Step 1: Access cPanel Log in to your cPanel account. In the main dashboard, locate and click on the "Terminal" option. Step 2: Run the Command to Adjust Permissions Copy and paste the following command into the Terminal: 1. find /home/$(whoami)/public_html -type d -exec chmod 755 {} \; && \ find /home/$(whoami)/public_html -type f -exec chmod 644 {} \; && \ find /home/$(whoami)/public_html -type f -name wkhtmltopdf* -exec chmod 755 {} \; && \ find /home/$(whoami)/public_html -type f -name zendid* -exec chmod 755 {} \; && \ find /home/$(whoami)/public_html -type f -name phantomjs* -exec chmod 755 {} \; 2. Press Enter to execute the command. Conclusion**:** Done! The permissions for the public_html folder have been successfully organized. If you encounter any issues or have questions, contact technical support.
Establishing remote connection to the MySQL database
Note: In this tutorial, we will be using DBeaver. **1.**Open DBeaver 1. Launch DBeaver. 2. Create a New Connection 1. Click the "New Database Connection" button or press Ctrl + Shift + N. 2. In the list that appears, select MySQL (you can type "MySQL" in the search bar). 3. Configure the connection details After selecting MySQL, configure the following fields: - Host: You can use the main domain of your hosting account or the MySQL server address (e.g., localhost or 127.0.0.1). - Port: The default port is usually 3306. - Database: The name of the database you want to access. - Username: Your MySQL username. - Password: The password for the user.
How to Create an Upgrade/Downgrade Request
How to Create an Upgrade/Downgrade Request Within the client area, go to Services. Then, select the service you want to upgrade or downgrade and click on "Manage." In the "Actions" options on the right, click on "Create Upgrade/Downgrade Request." Choose the type of Upgrade/Downgrade you want. After selecting, click on "Click to continue."
How to open a ticket.
How to open a ticket. To open a ticket in the customer area of Scriptcase Host, follow these steps: 1. Access the client area at https://clientarea.scriptcase.host/clientarea.php. 2. Log in with your username and password. 3. In the menu, click on Support > Open Ticket. 4. Choose the department you want to open the ticket with. 5. Describe what you need and click "Submit". After opening the ticket, you can track the responses in the same area. 🚀
How to update Scriptcase
How to update Scriptcase Step 1. On the cPanel home page, find the "Scriptcase" icon in the SOFTWARE section and click on the icon. Step 2. Select the desired Scriptcase installation for the update. Step 3. Select the "Update" option. Wait for the update to complete and you're done! Always pay attention to the PHP version.
How to Add SPF, DKIM, and TXT Records in cPanel
To make these DNS entries in cPanel, you need to access the "Zone Editor" option. Below are the detailed steps: 🔧 How to Add SPF, DKIM, and TXT Records in cPanel: 1. Log into your cPanel. 2. Go to the "Domains" section and click on "Zone Editor". 3. Click "Manage" next to the domain you want to edit. ✅ Adding the Records: 📌 SPF Record: - Click "Add Record" - Type: TXT - Name: (Leave it blank or use your domain name if required) - TTL: Default (or 14400) - Record: v=spf1 include:_shooting.shootinghouse.com.br ~all 📌 DKIM Record: - Type: TXT - Name: shooting._domainkey.yourdomain.com (Replace yourdomain.com with your actual domain) - TTL: Default - Record: (Paste the full key as a single line, even if originally broken into parts) ⚠️ Important: Ensure the DKIM p= key is entered as one continuous string without line breaks, like this: v=DKIM1; k=rsa; p=MIIBIjANBgkqhkiG9w0BAQEFAAOCAQ8AMIIBCgKCAQEAu7uCOxPYL+sKEMbbZwlI7en7ImGUgQK5rjyaxWhJxehPk129i0GVnwnwD3chRni0yFjFJSDR/zCTBPSi+UsYqgBpnRZMvufic7oSywwuJFfgHYGIFsYlpoJ9D+i7QIOD+wH5YPoW8BJhLtMUgrAPh/UacgXsn9V0J8uerxqZjVgLXyq70TmQSz16+PdYVSBX90IukGp3BrKmqa+nFjSDNwPJ+GW06d2vT6ntmRWtJPaIEa3mC3brlhLsljYebkTXfrcwerfMtS7ULWpqVXl3vPcNNOpDCHTThWxv1sw/SKwUjPc/FxhKPAv+9dqZc+9MHhmNDk6eia7UYh9LSb7o6wIDAQAB
How to Import a Large Database via SSH
You need to have: - Access to the cPanel of your hosting account. - SSH access enabled (if you don't have it, request it from your hosting provider). - The .sql backup file already uploaded to the server (via FTP or through the cPanel File Manager). - A MySQL user with permissions on the database. 1. Log in to your cPanel Go to: yourdomain.com/cpanel Enter your username and password. 2. Create the database and the MySQL user Inside cPanel: - Go to "MySQL Databases". - Create a new database. - Create a MySQL user (or use an existing one). - Link the user to the database and grant all privileges. Save the following information: - Database name (e.g., user_db) - Database user (e.g., user_user) - Password 3. Upload the .sql file to the server Use the File Manager in cPanel or an FTP client like FileZilla. Upload the .sql file to the desired directory, for example: /home/your_user/ 4. Access the server via SSH Use a terminal (on Linux or macOS) or the PuTTY program (on Windows). Access command: ssh your_user@yourdomain.com 5. Import the database using the MySQL command Once connected via SSH, run the following command: mysql --force -u username -p database_name < file.sql - You will be prompted for the MySQL user’s password. - The process may take several minutes depending on the size of the file. 6. Verify that the import was successful Access phpMyAdmin from cPanel. Open the database and check that the tables and data are present.
How to use the Setup Python App
How to use the Setup Python App 1. In cPanel, open Setup Python App. 1. Click Create Application. 2. Choose the Python version. 3. Application Root: folder where your application will be located. 4. Application URL: domain or subdomain that will run the app. 5. Application Startup File (initialization file), e.g., app.py, main.py. 6. Application Entry Point (name of the WSGI object). 7. Click Create. Possible issues and solutions Error 500 → Check if the Entry Point is correct (app in Flask, application in Django). Permissions → All files must be in the folder configured in Application Root.
How to generate a MySQL backup using mysqldump
How to generate a MySQL backup using mysqldump 1. Access the server via SSH ssh user@your_server 2. Run the command to generate the backup mysqldump -u user -p database_name > backup.sql 1. user → MySQL username 2. database_name → the database you want to export 3. backup.sql → the name of the file that will be generated 1. After running the command, the terminal will ask for the MySQL password. Type it and press Enter. 2. Important: nothing will appear while typing the password — this is normal. 3. Wait for the process to finish The command will generate the backup.sql file in the same directory where it was executed. 4. Download the file to your local machine (optional) If you want to copy the backup to your local machine, use: scp user@your_server:/path/backup.sql . 1. Replace /path/backup.sql with the correct path where the file was saved. 2. The final dot (.) indicates that the file will be downloaded to the current directory.